How to Seal Roof Flashing Leaks

When a roof leaks, the flashing — not the shingles — is the culprit most of the time: a cracked rubber vent boot, a lifted piece of step flashing, or a failed bead of sealant at the chimney. These are $10-40 fixes if you catch them early, versus thousands once water rots the decking below. This guide shows you how to trace the leak to its flashing, make the right repair with the right sealant (not a smear of roofing tar), and test it — plus the honest line between a walkable one-story repair and a roofer's job.
What You'll Need
🛠 Tools
📦 Materials
Safety First
- •Only work a roof you can walk safely: one story, dry shingles, calm weather, and a pitch of 6/12 or less. Steeper, wet, or second-story roofs are a roofer's job — and anchored fall protection is cheap insurance even on walkable slopes.
- •Work on a mild, dry day (roughly 50-80°F). Hot shingles scar and tear underfoot; cold shingles crack when lifted, and most sealants won't bond to damp surfaces.
- •Set the extension ladder at the 4-to-1 angle with a stabilizer, extend it 3 feet above the roof edge, and have a helper foot it. Never step on or over a gutter.
Step-by-Step Instructions
Trace the Leak From the Attic First
Don't climb onto the roof to look for a leak — find it from below. During or just after rain, get into the attic with a flashlight and find the drip or the freshest stain, then follow the water trail uphill along the rafter or decking to its highest point: that's near the entry hole, and it's almost always at a penetration uphill of the stain. Measure from a fixed reference — the chimney, a vent pipe, a gable wall — so you can locate the same spot from on top.
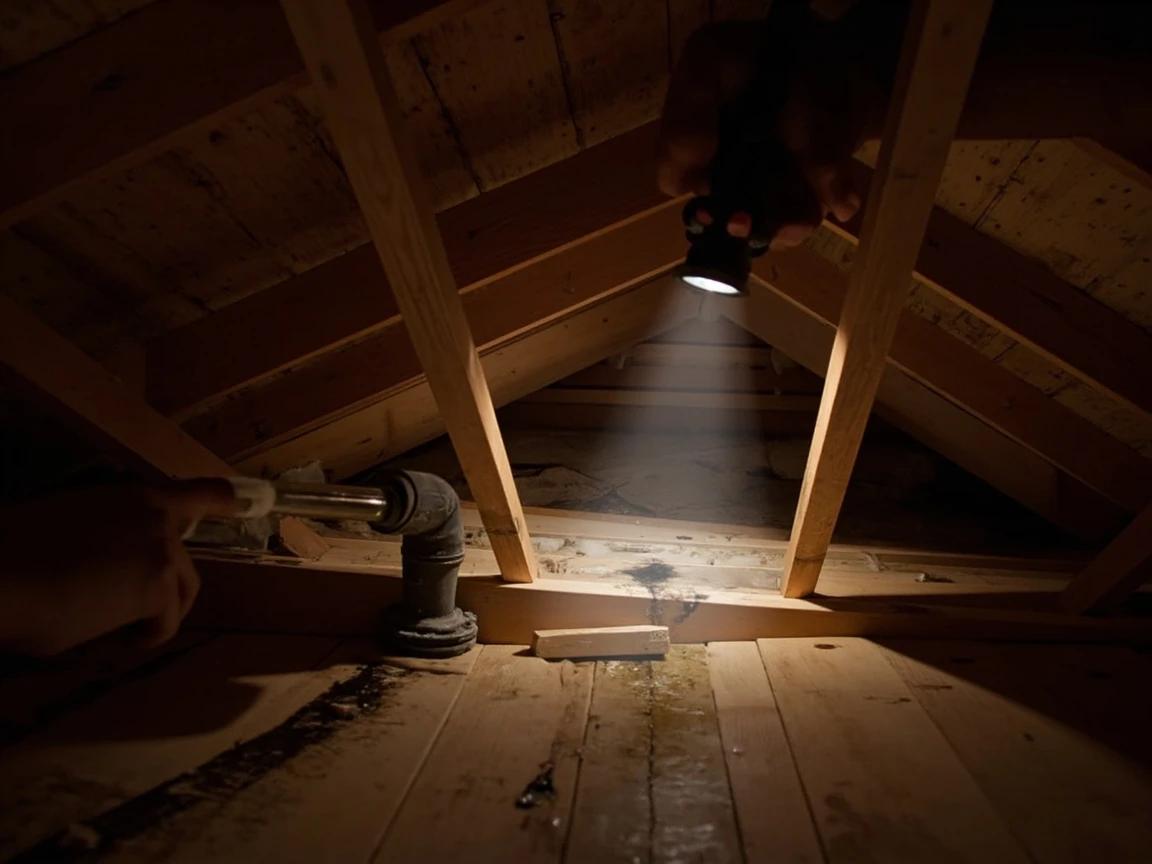
No attic access or no rain in the forecast? Run the hose-test in reverse order later: wet the roof in sections from the bottom up while a helper watches inside, and the leak announces itself when you reach its zone.
Pick a Safe Day and Set Up Properly
This repair happens on the roof, so the conditions are part of the job. Wait for a dry, calm day between roughly 50 and 80°F — sealants need a dry surface, hot shingles scar underfoot, and cold ones crack. Set the extension ladder at the 4-to-1 angle with a stabilizer bar, extended 3 feet past the roof edge, with a helper footing it. Wear soft-soled shoes with grip, step on the lower half of each shingle course, and stay well back from edges. If the pitch is steeper than about 6/12 or you feel insecure, stop — this one's a roofer call.
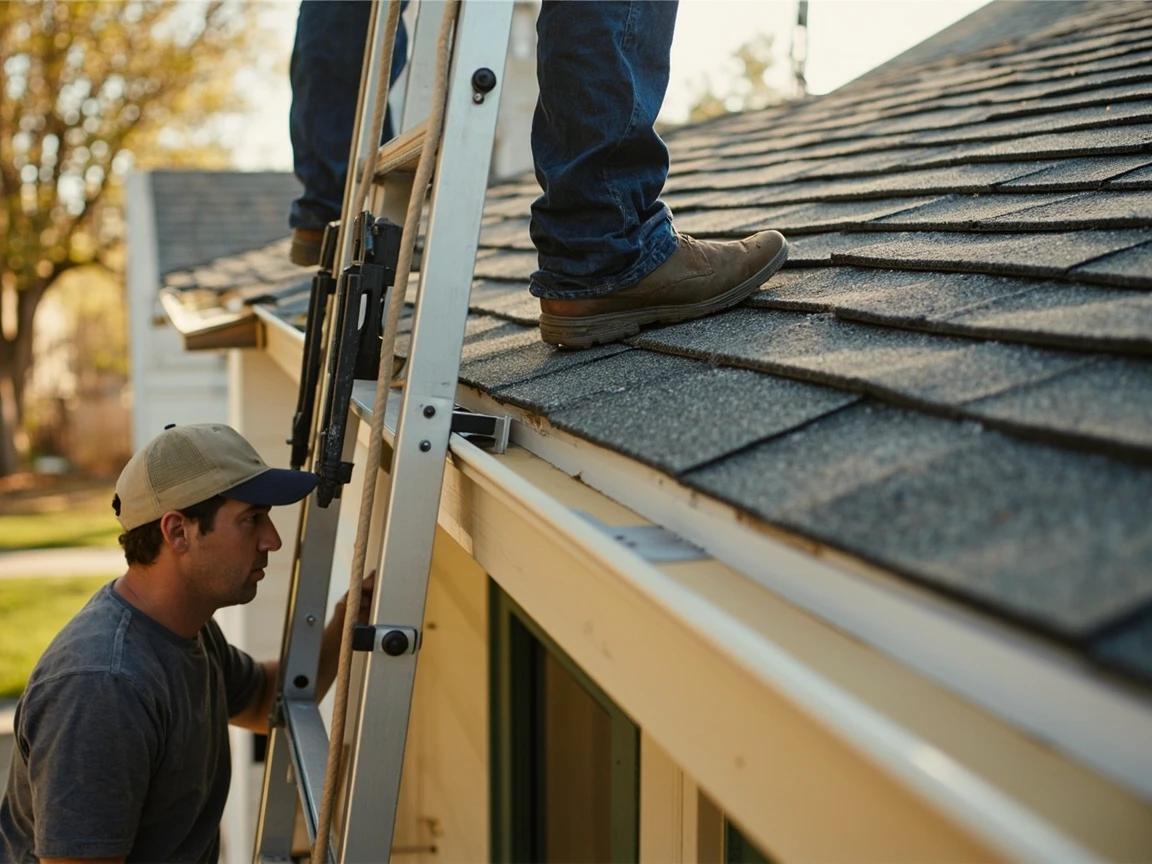
One-story, dry, walkable-pitch roofs only. Falls are the most common serious DIY injury, and a $200 service call is always cheaper than an ER visit — use a roof anchor and harness even on easy slopes if you own one.
Inspect the Flashing at the Leak Zone
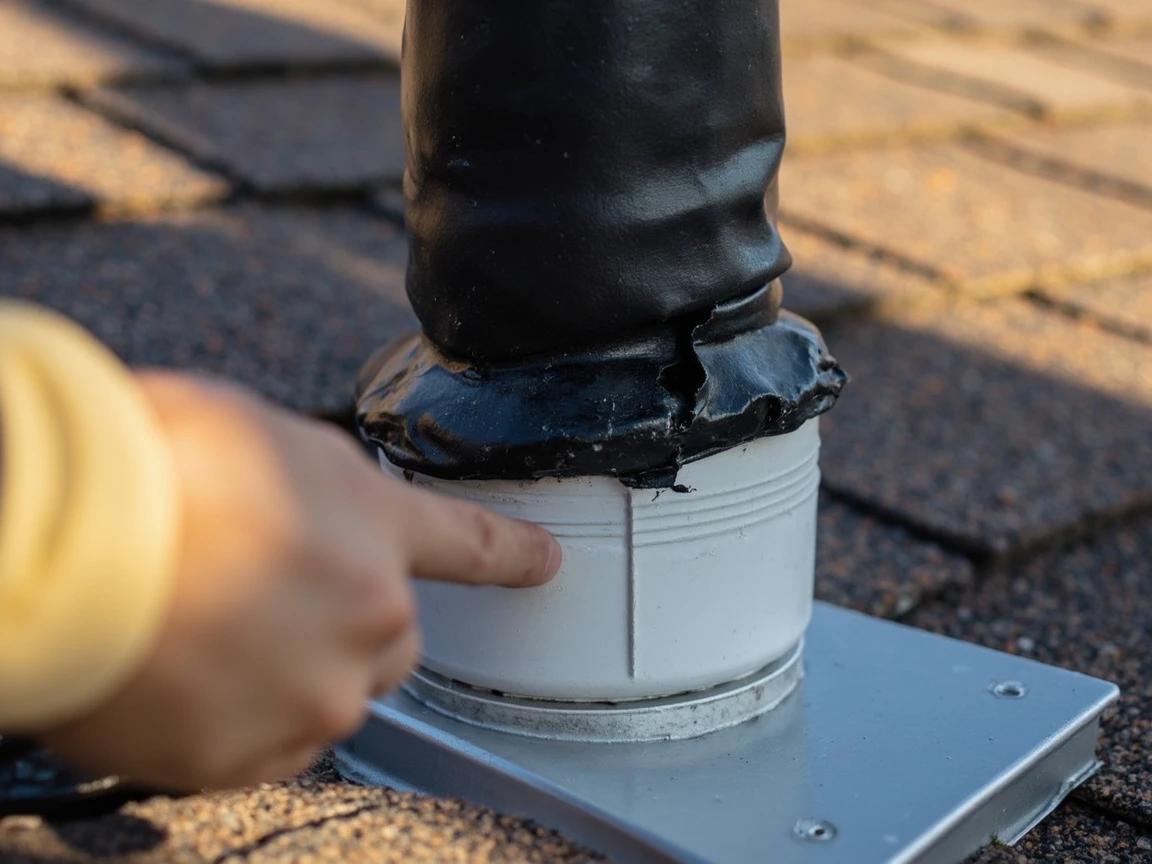
At the spot you located from the attic, examine every piece of metal and rubber. On vent pipes, look for a cracked or split rubber boot where it grips the pipe. At chimneys and walls, check the step flashing (the shingle-woven pieces) for lift, rust, or missing sections, and the counter-flashing above it for sealant that has shrunk or pulled out of the mortar joint. In valleys and at skylights, look for pinholes, rust, and nail heads that have backed out through the metal. Press gently — flashing that flexes or shifts has lost its fastening.
Clean the Repair Area Down to Sound Surfaces
Sealant is only as good as what it sticks to. Wire-brush rust, flaking paint, and crumbled old sealant off the flashing, scrape failed beads and old roofing cement away with a putty knife, and sweep grit off the surrounding shingles. Wipe the metal with a dry rag. If old hardened sealant won't release, slice it free with a utility knife rather than layering new product over it — new-over-old is how the same leak comes back next spring.

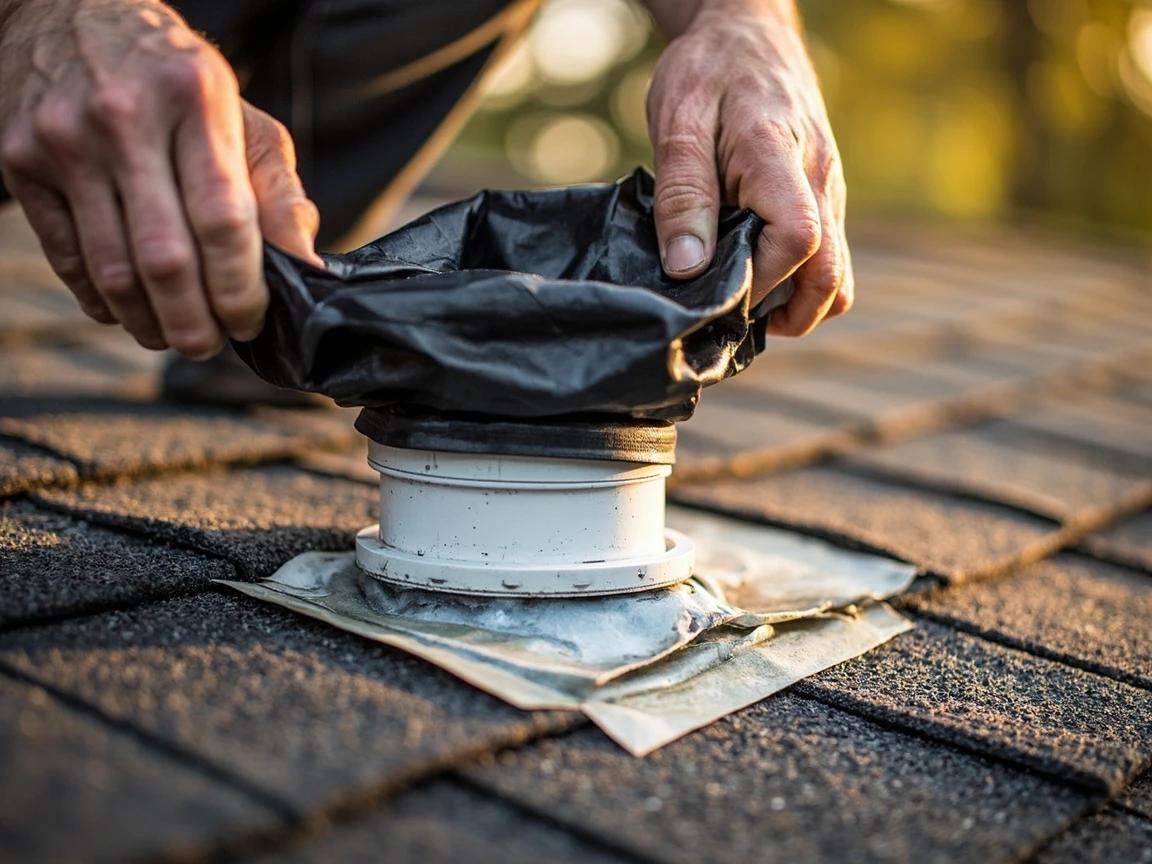
Fix a Cracked Vent-Pipe Boot
For the most common flashing failure, you have two clean options. Fastest: a slip-over repair boot — a flexible collar that slides down the pipe and seats over the old cracked boot, no shingle work at all. More thorough: replace the whole boot flashing by gently lifting the shingles above it with a flat pry bar, pulling its nails, sliding the old unit out and the new one in so its flange sits under the shingles uphill and over them downhill. Nail the exposed corners and dab each head with sealant.
Take a photo of the pipe and measure its diameter (usually 1-1/2, 2, 3, or 4 inches) before the store run — boots are sized to the pipe, and the wrong size won't seal no matter how much caulk you add.
Re-Seat and Re-Seal Step and Counter-Flashing
Lifted step flashing gets pressed back into plane and re-fastened high under the shingle course with a galvanized roofing nail, never through its exposed face. Where chimney counter-flashing sealant has failed, rake the old bead out of the joint and gun a fresh, continuous bead of polyurethane sealant along the top edge where the metal meets the masonry, tooling it smooth so water sheds. The goal is a thin, neat, complete seal at every metal-to-masonry and metal-to-metal seam in the leak zone.
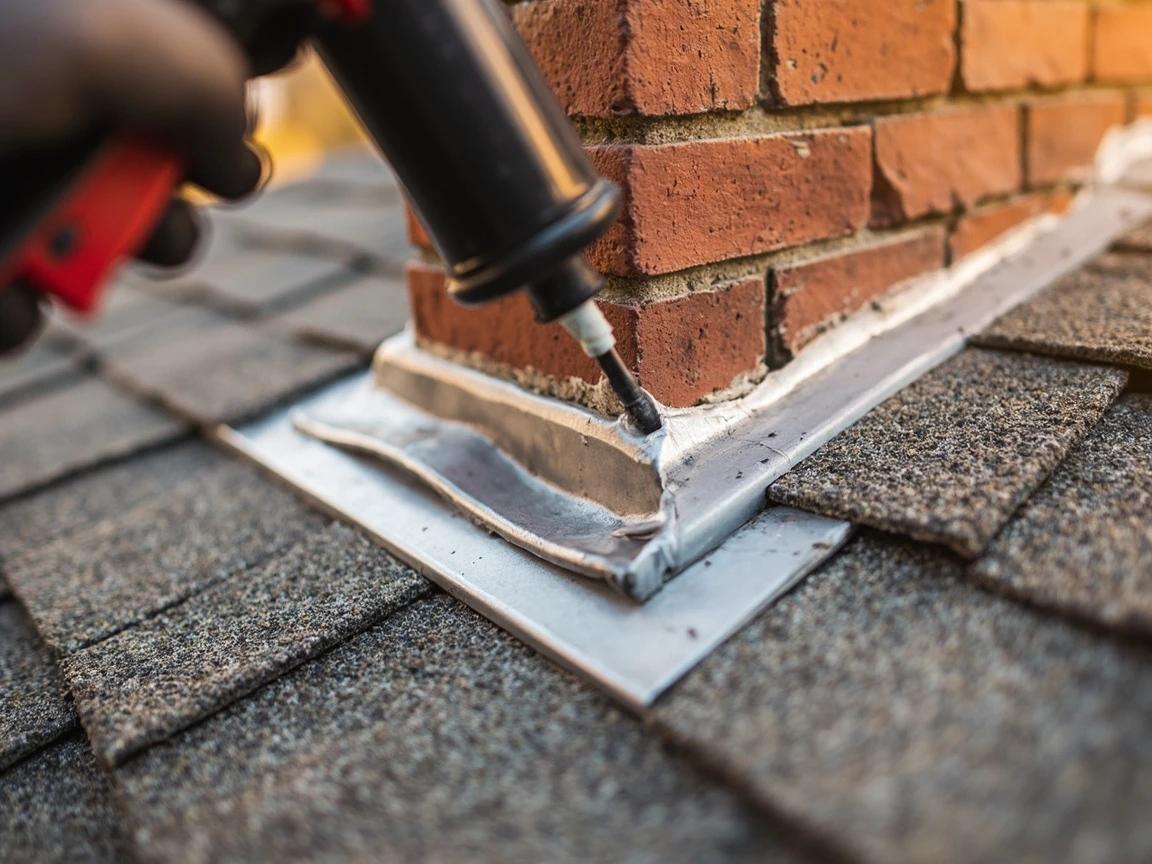
Don't bury the chimney in black roofing cement. A troweled-on smear traps water behind it, hides the real failure, and makes the proper repair harder — use a neat bead of the right sealant at the actual seam instead.
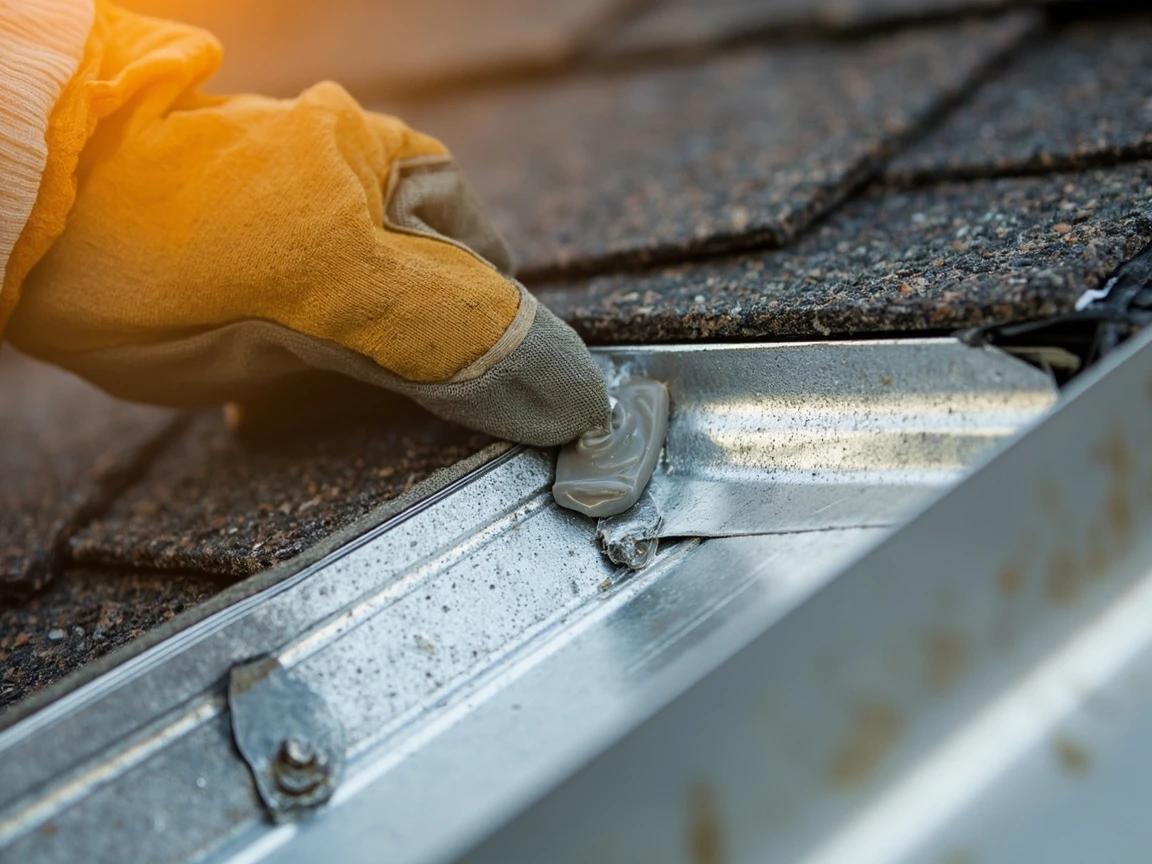
Seal Nail Heads and Pinholes, Tape the Seams
Backed-out nails are sneaky leakers: drive them snug (or replace with a slightly longer roofing nail beside the old hole) and cap each head with a dab of sealant. Seal pinholes in valley or step flashing with a small patch of butyl flashing tape pressed hard onto cleaned metal — tape bridges movement better than a blob of sealant. For belt-and-suspenders protection at a boot's downhill flange or a seam that has leaked before, lay a strip of flashing tape across the joint and roll it firmly.
Hose-Test the Repair
Give the sealant the cure time on the tube (typically 24 hours for polyurethane skinning, longer to full cure), then test honestly. Have a helper watch the original drip spot in the attic while you run a gentle hose stream over the repair from below it, working uphill in stages for several minutes per zone — don't blast water uphill under the shingles, which fails even a healthy roof. No drips after a thorough soak means the repair holds; recheck once more after the next real storm.
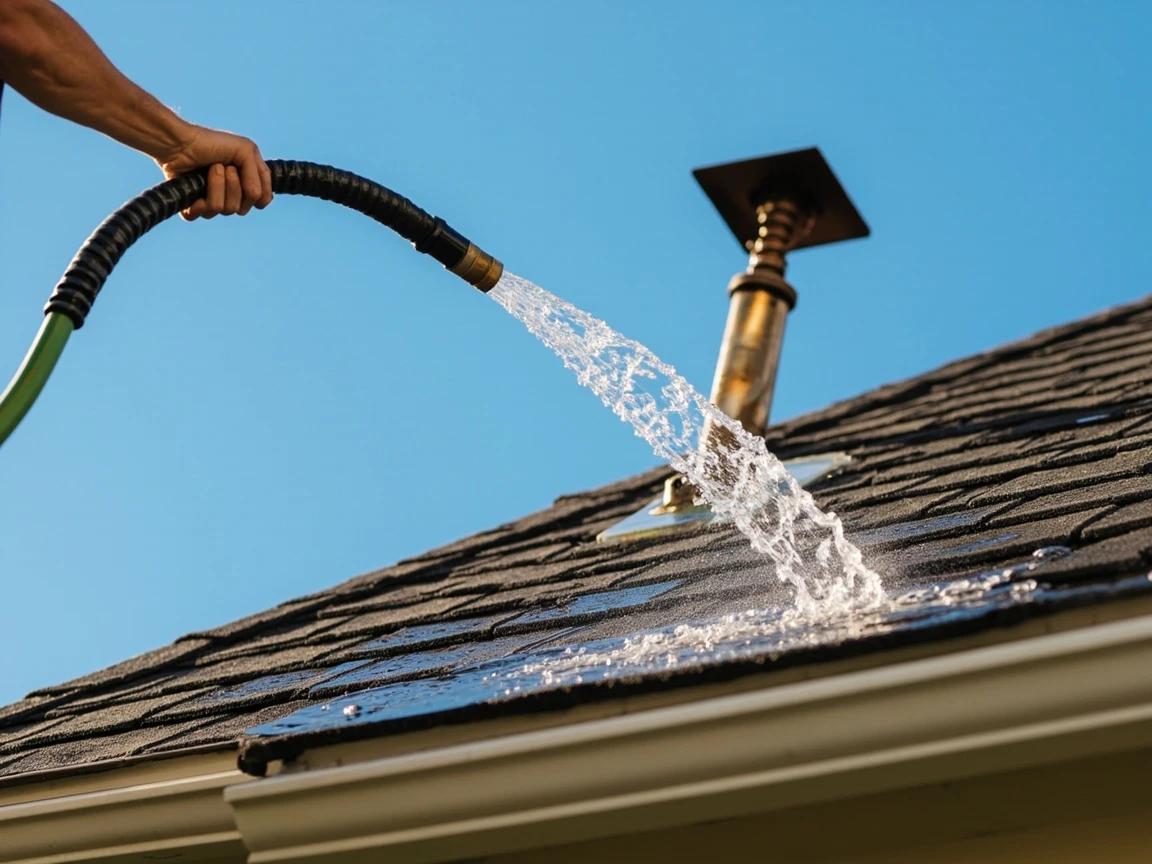
Mark your repair date on the attic framing near the old stain with a pencil. If a future stain appears, you'll know instantly whether it's the old mark or a new problem.
Make It a Maintenance Habit
Flashing repairs buy years, not decades — rubber boots last 10-15 years and sealant beads 5-10, both shorter than the shingles around them. Add the leak zone to your twice-a-year roof inspection from the ground with binoculars, re-check the attic after the first heavy rain each season, and plan to refresh sealant before it visibly cracks. If the same flashing fails twice, stop patching: that's the signal the metal itself needs replacing on the next roofer visit.

Frequently Asked Questions
What is the best sealant for roof flashing?
+
Polyurethane roofing sealant is the workhorse: it bonds metal to asphalt shingles, stays flexible for years, and takes paint. Butyl flashing tape is the right call for backing up seams and pinholes. Skip interior/painter's caulk entirely (it fails in one season outdoors), and use black roofing cement sparingly — it dries out and cracks, and a thick smear of it usually just hides the problem while water keeps moving underneath.
Why is my roof leaking around the vent pipe?
+
The rubber boot that seals the pipe is the most failure-prone part on a roof: UV dries it out and it splits where it grips the pipe, typically after 10-15 years — often long before the shingles fail. The fix is a slip-over repair boot dropped down the pipe over the old one, or a full boot replacement. A bead of sealant on a cracked boot is a one-season patch at best.
Can I just caulk a roof leak?
+
Sealant fixes sealant problems — a failed bead at counter-flashing, an exposed nail head, a pinhole. It does not fix mechanical problems: a cracked boot, lifted or rusted-through step flashing, or shingles that lost their seal. Match the repair to the failure; if you find yourself caulking the same spot twice, the flashing itself needs to be repaired or replaced.
How do I find where my roof is actually leaking?
+
Start in the attic with a flashlight during or right after rain: find the wet spot or stain, then follow the water trail uphill along the rafters and decking to its highest point — water can travel several feet from the entry hole before it drips. The entry point is almost always at a penetration: a vent pipe, chimney, skylight, or valley uphill of the stain. Measure from a reference like the chimney or a vent so you can find the same spot on top of the roof.
How long does roof flashing last?
+
Galvanized or aluminum step flashing commonly outlasts the shingles — 20-40 years — which is why it's often reused in a re-roof. The weak links are rubber vent boots (10-15 years) and sealant beads (5-10 years), so most 'flashing leaks' are really boot or sealant failures. Rusted-through or corroded step flashing, though, means replacement, not sealant.
Community Tips
💬 Sign in to share tips with the community
Sources & further reading
- How to Fix and Maintain a Leaking Rooftop Vent Pipe — This Old House
- Vent Flashing Done Right — Fine Homebuilding
- How to Repair Roof Flashing — HomeTips
More Roofing & Siding Guides
View all → Medium3 hrs
How to Install Gutter Guards
Cleaning gutters twice a year is the chore gutter guards exist to kill — and the snap-in screen and micro-mesh panels at any home center install with basic tools for $1-3 per linear foot, versus $1,500+ for a professionally installed system. The job is genuinely DIY-able on a single-story home: clean the gutters, fit and fasten the panels, and test with a hose. This guide covers choosing the right guard type, the ladder setup that keeps you safe, and the one installation mistake (tucking guards under shingles) that can void a roof warranty.
 Medium45 min
How to Repair Vinyl Siding
Cracked, holed, or loose vinyl siding panels let moisture behind the wall sheathing where it causes mold, rot, and insect damage — problems that cost thousands to fix if ignored. Replacing a single damaged panel is a straightforward 45-minute job once you own a $5 zip tool, and patching small holes takes even less time. This guide covers both patch repairs for holes under an inch and full panel replacement, so you can match the fix to the damage.
 Medium2 hrs
How to Patch Cracks in a Concrete Driveway
Every crack in a concrete driveway is a water channel, and every winter that water freezes, expands, and pries the crack wider — which is why a $15 tube of polyurethane sealant today beats a $5,000 replacement in five years. The fix depends entirely on crack width: pourable filler for hairlines, backer rod and flexible caulk for the middle sizes, vinyl patcher for wide or crumbling sections. This guide sorts your cracks into the right bucket and walks each repair start to finish.
You Might Also Like
 Easy3 hrs
Spring Lawn Care Checklist
What you do to your lawn in the first six weeks of spring determines its health for the entire growing season. Follow this sequence to fix winter damage, encourage deep roots, and crowd out weeds before they establish.
 Easy1 hr
How to Start a Compost Bin
Composting converts kitchen scraps and yard waste into rich, free fertilizer that dramatically improves garden soil. Setup takes under an hour and once running, the bin requires minimal effort for big rewards.
 Medium2 hrs
How to Prune Fruit Trees
Regular pruning is the most important annual task for fruit tree health and productivity. Properly pruned trees produce larger, higher-quality fruit, resist disease better, and live significantly longer than unpruned trees.