How to Start a Compost Bin

Composting converts kitchen scraps and yard waste into rich, free fertilizer that dramatically improves garden soil. Setup takes under an hour and once running, the bin requires minimal effort for big rewards.
What You'll Need
🛠 Tools
📦 Materials
Safety First
- •Do not compost meat, fish, dairy, cooked foods, pet waste, or diseased plants — they attract pests and create dangerous pathogens.
Step-by-Step Instructions
Choose the Right Location
Pick a spot that's partially shaded (to prevent the pile from drying out too fast), easily accessible from your kitchen and garden, and away from wooden structures or fences. A flat, well-drained area works best. Leave at least 3 feet of clearance around the bin for turning access.

Set Up the Bin
A commercial plastic compost bin works well for beginners and costs $30-60. Alternatively, wire four wooden pallets together into a square enclosure — pallets are often free from lumber yards and grocery stores. Minimum effective size is 3'×3'×3'. For solid containers, drill 1/2" holes every 6 inches in the sides and bottom for airflow and drainage.

A two-bin system (one bin for fresh materials, one for finished compost) makes harvesting much easier. But start with one bin and expand when you're comfortable with the process.
Lay a Carbon Base Layer
Start with a 4-6 inch layer of brown, carbon-rich materials: dry leaves, shredded corrugated cardboard (remove tape), wood chips, or straw. Brown materials provide carbon, absorb moisture, and create air pockets. Never use glossy paper or cardboard with heavy printing.

Add Green Nitrogen Materials
Add a 2-3 inch layer of nitrogen-rich green materials: raw fruit and vegetable scraps, fresh-cut grass clippings, coffee grounds and filters, tea bags, or fresh plant trimmings. The ideal carbon-to-nitrogen ratio is roughly 3:1 by volume — 3 parts browns to 1 part greens.

Do not add meat, bones, dairy, oily foods, diseased plants, pet waste, or anything treated with pesticides. These create odors, attract rodents, and can spread pathogens.
Moisten the Pile
The pile should feel like a wrung-out sponge — moist throughout but not dripping when you squeeze a handful. Use a garden hose to mist each layer as you add it. A dry pile decomposes very slowly; an overly wet pile becomes anaerobic and smells like sewage.

If the pile smells bad (like ammonia), it has too many greens — add more browns. If it's not decomposing after a month, it's too dry or lacks nitrogen — water it and add more greens.
Continue Building in Layers
Always cover fresh kitchen scraps with a layer of brown material. This reduces fruit flies and odors dramatically. Continue alternating brown and green layers, moistening each, as you add materials over time.

Coffee grounds from local cafés are an excellent free nitrogen source. Many cafés will happily give away used grounds in sealed bags.
Turn Regularly
After 1-2 weeks, use a garden fork to turn the pile, moving outside material to the center and inside material to the edges. Turning introduces oxygen, which is essential for aerobic decomposition. An active, hot pile (130-160°F internally) needs turning every 1-2 weeks. Cold composting works too — just add material and turn monthly.

Harvest Finished Compost
Finished compost is dark brown to black, crumbly, earthy-smelling (like forest floor), and the original materials are unrecognizable. This takes 2-6 months depending on activity. Dig finished compost from the bottom of the pile and sift if needed. Apply 2-3 inches to garden beds — finished compost is the ideal soil amendment for a new raised garden bed or a young privacy hedge — or work it into the top 6 inches of soil before planting.

Frequently Asked Questions
How long does it take to start a compost bin?
+
This project typically takes about 1 hr. The guide includes 8 steps with detailed instructions for each.
What tools do I need?
+
You will need: Shovel or garden fork, Drill with 1/2" bit (for DIY bin), Wire cutters (optional). Materials include: Compost bin (purchased plastic bin or 4 wooden pallets wired together), Brown materials: dry leaves, shredded cardboard, wood chips, or straw, Green materials: vegetable scraps, fresh grass clippings, coffee grounds, Water.
Is this a good project for beginners?
+
Yes! This is rated as an easy project that most homeowners can complete with basic tools and no prior experience.
Community Tips
💬 Sign in to share tips with the community
Sources & further reading
- Composting At Home — U.S. Environmental Protection Agency
- Reducing and Reusing Basics — U.S. Environmental Protection Agency
More Gardening Guides
View all → Medium30 min
How to Safely Remove a Wasp or Hornet Nest
A small paper wasp nest under the eave is a legitimate $10 DIY job — if you identify the insect correctly, treat at dusk, and keep 20 feet between you and the nest. The same can of spray pointed at the wrong nest (yellowjackets in the ground, bald-faced hornets in a tree, anything inside a wall) earns you dozens of stings and a colony chewing into your living room. This guide teaches the identification that decides DIY versus pro, the dusk-treatment method that works, and the one mistake — sealing an active wall nest — that turns a $400 pro visit into drywall repair.
 Medium3 hrs
How to Build a Simple Garden Trellis
A sturdy 6-foot cedar trellis turns a flat patch of soil into a vertical garden — doubling your growing space, improving airflow around climbers like peas, beans, and cucumbers, and giving roses, clematis, and morning glories a structure that lasts 10+ years. This guide walks you through a freestanding 4-foot-wide grid trellis built with two 4x4 posts and a 1x2 lattice for $40-90 in materials and an afternoon of work, no advanced carpentry required.
 Easy1 hr
How to Grow Herbs in a Window Box
A 30-inch window box on a sunny windowsill produces enough basil, parsley, thyme, and chives to keep a household supplied all summer — for under $80 in materials and about an hour of setup. This guide covers everything from picking the right window and box, to mounting it safely, choosing herbs that thrive together, and the harvesting technique that doubles a basil plant's output.
You Might Also Like
 Easy1h 30m
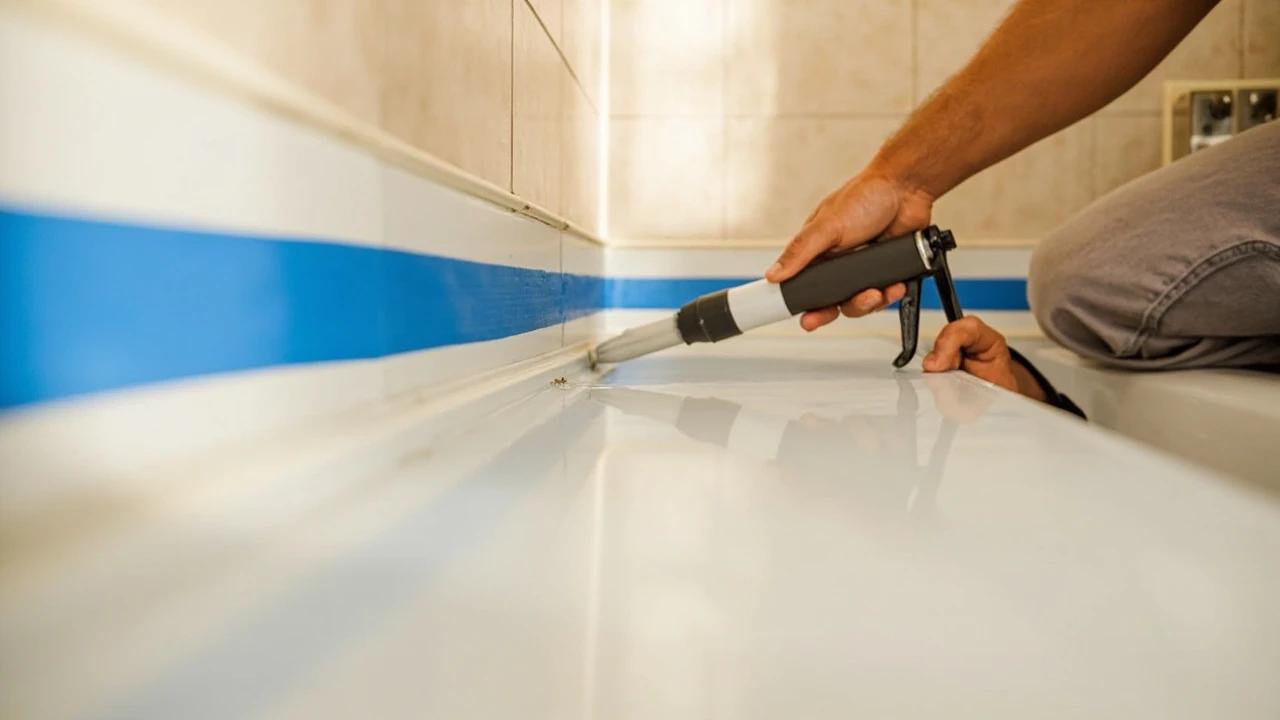
How to Re-Caulk a Bathtub or Shower Surround
Mildewed, cracked, or peeling caulk around a bathtub isn't just ugly — it's letting water reach the drywall and studs behind the wall, which turns a $10 caulk job into a thousand-dollar tile-and-framing repair. This guide walks through removing the old caulk completely, treating mold, masking and tooling a clean single bead of 100% silicone, and the curing schedule that keeps the new joint waterproof for years.
 Easy25 min
Best Deck Stain: Transparent vs Semi vs Solid
There is no "best" deck stain — there is the right stain for your sun exposure, wood condition, and how often you want to redo the job. Transparent stains last 1-2 years but let the natural grain show. Solid stains last 4-7 years but look like paint. This guide walks the four opacity levels and the oil-vs-water choice so you pick the one that matches your deck and your tolerance for re-staining.
 Hard4 hrs
How to Install Crown Molding
Crown molding turns a plain room into a finished one — but it is the trickiest trim to cut, thanks to corners that are never quite square and a profile that has to be cut upside down. This guide walks through the whole job the way a finish carpenter does it: coping inside corners so they stay tight, mitering outside corners, and fastening into framing instead of bare drywall. Expect about half a day for a typical room and roughly one to six dollars per linear foot in materials.