How to Patch Cracks in a Concrete Driveway
Every crack in a concrete driveway is a water channel, and every winter that water freezes, expands, and pries the crack wider — which is why a $15 tube of polyurethane sealant today beats a $5,000 replacement in five years. The fix depends entirely on crack width: pourable filler for hairlines, backer rod and flexible caulk for the middle sizes, vinyl patcher for wide or crumbling sections. This guide sorts your cracks into the right bucket and walks each repair start to finish.
What You'll Need
🛠 Tools
📦 Materials
Safety First
- •Cement-based patching compounds are caustic — wet product burns skin slowly and painlessly until damage is done. Wear nitrile or rubber gloves and safety glasses when mixing and troweling.
- •Chiseling or grinding concrete releases crystalline silica dust that scars lungs. Wear an N95 or better, work outdoors, and mist the area lightly to keep dust down.
Step-by-Step Instructions
Sort your cracks by width and behavior
Walk the driveway and measure the cracks — a ruler or even a quarter (about 1/16 inch thick) works. Hairlines that barely fit a fingernail get pourable filler; anything from 1/8 to 1/2 inch gets flexible polyurethane sealant; wider than 1/2 inch, crumbling edges, or shallow surface flaking calls for vinyl patching compound. Also check whether the two sides sit level with each other: a height offset means the slab has settled, which is a leveling problem, not a filling problem.

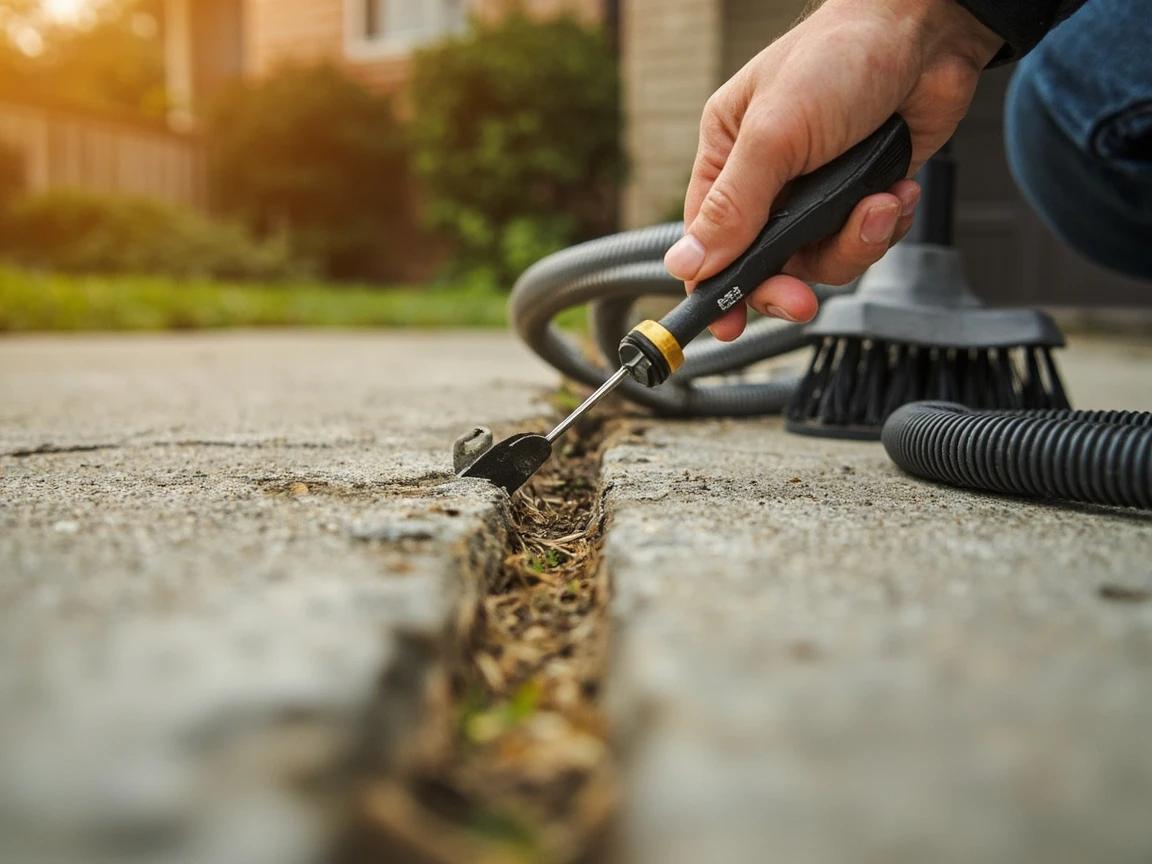
Rake out and clean every crack
Filler bonds to concrete, not to dirt, moss, or last year's failed caulk. Drag a flat-head screwdriver or 5-in-1 tool along each crack to pull out weeds, roots, and loose debris, scrub the walls with a wire brush, then vacuum or blow the crack clean. If the whole driveway is grimy, this is the day to power wash it — just let the concrete dry for 24 hours afterward, because sealant will not bond to damp walls.
Undercut wide cracks so the patch can grip
For cracks getting vinyl patching compound, use a cold chisel and 3-pound hammer to shape the crack walls so the bottom is slightly wider than the top — an inverted V that mechanically locks the patch in place. Angle the chisel into each wall and work along the crack, then clean out the chips. Skipping the undercut is why so many driveway patches pop out whole after one winter.
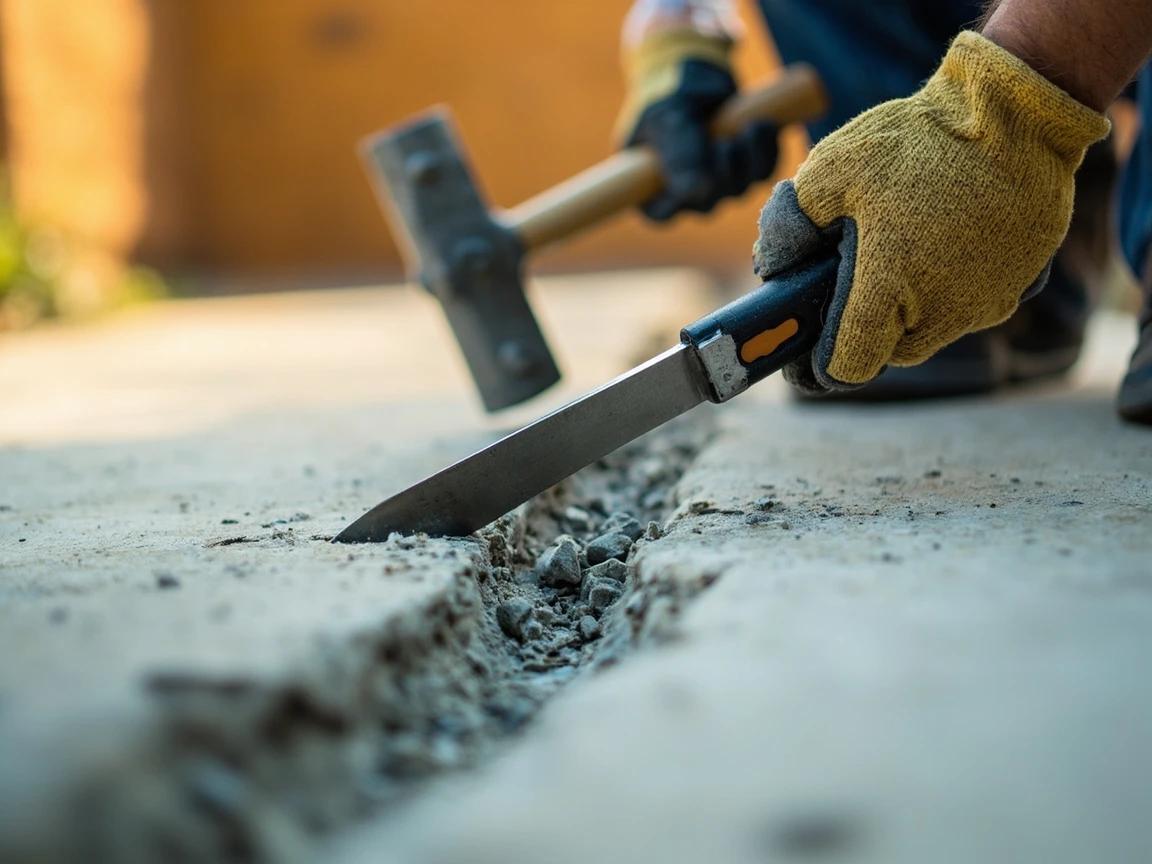
Chiseling concrete throws sharp chips and silica dust — safety glasses and an N95 are non-negotiable for this step.
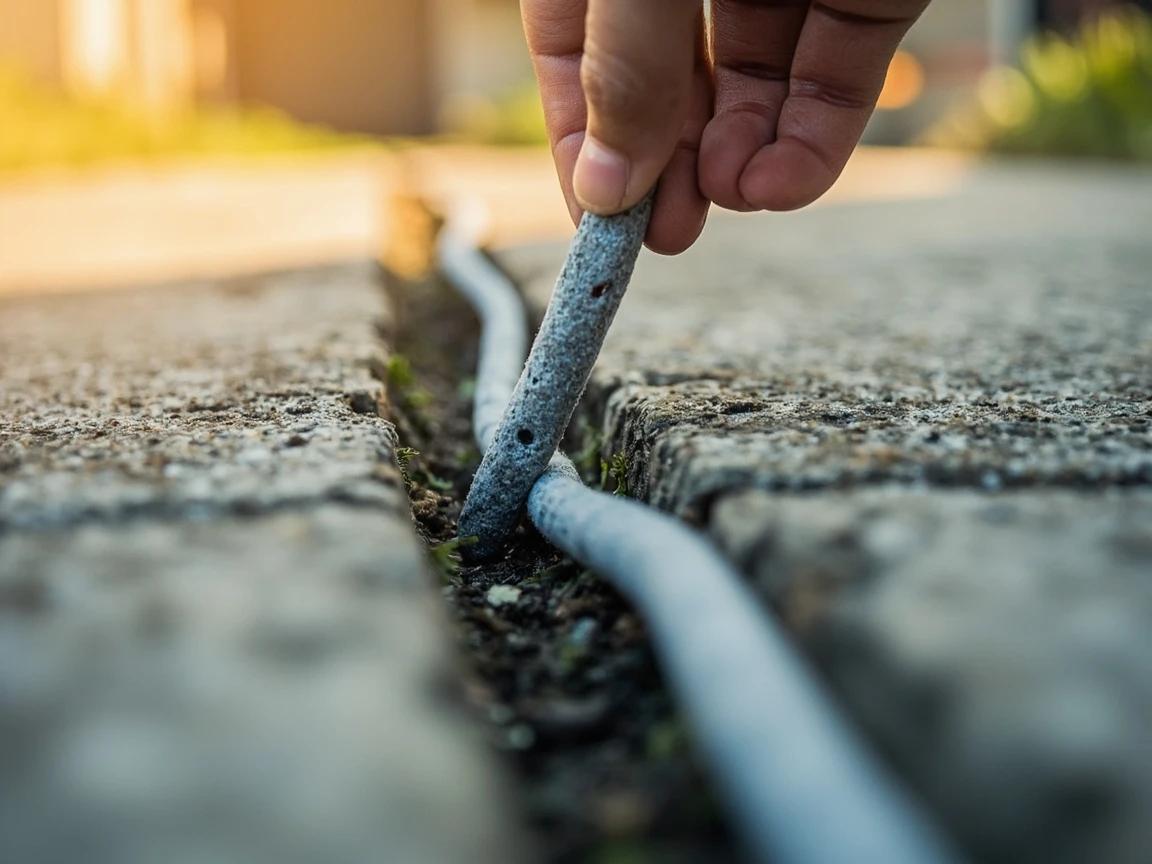
Press backer rod into deep cracks
Sealant works best in a layer 1/4 to 1/2 inch deep — deeper pours cure poorly and waste half the tube down the crack. For cracks deeper than that, press closed-cell foam backer rod (sized about 25 percent wider than the crack) down into the gap with a putty knife until it sits roughly 1/4 inch below the surface. The rod bottoms out the joint, controls the sealant depth, and lets the sealant flex the way it is designed to.
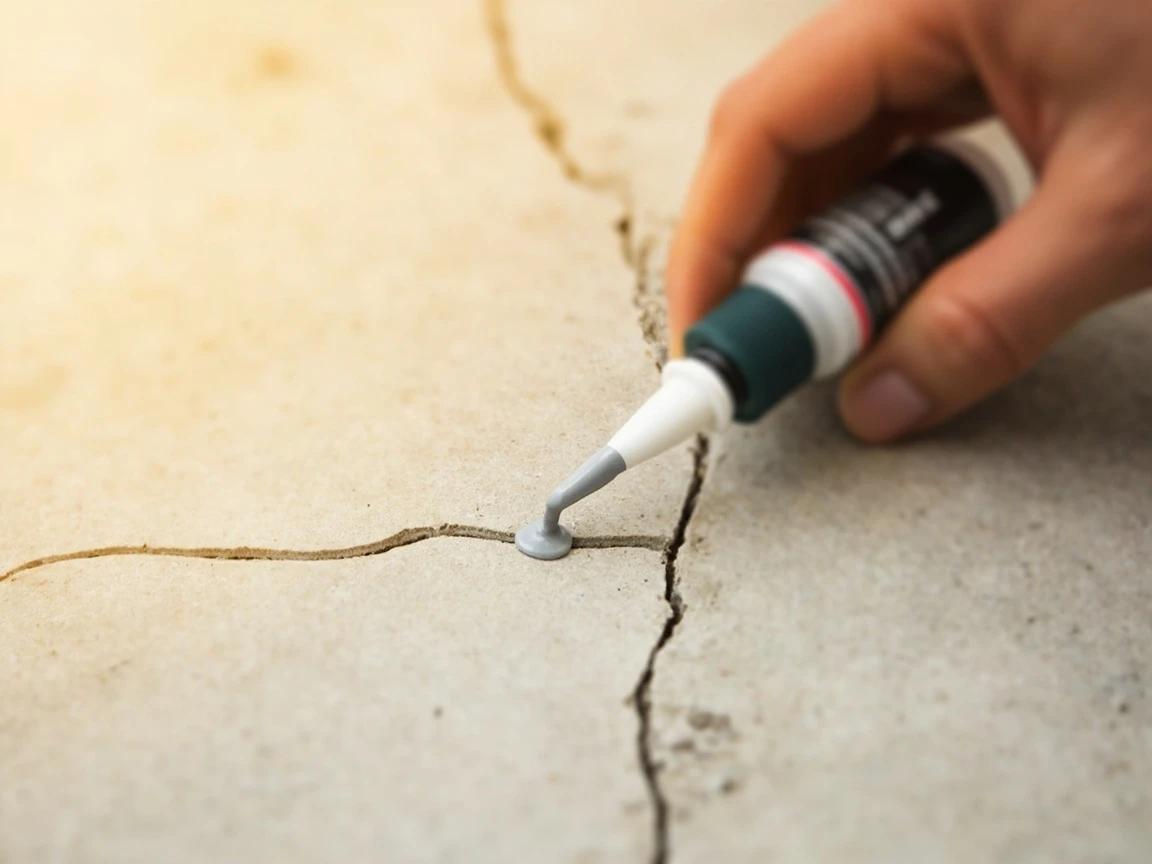
Pour hairline cracks full of liquid filler
Cut the applicator spout small, then run a bead of pourable crack filler directly into each hairline, letting the thin liquid wick down into the crack. Fill in stages if it keeps settling — hairlines connect to surprising volume below. Wipe overspill with a damp rag immediately; cured filler on the surface reads as a shiny stripe forever.
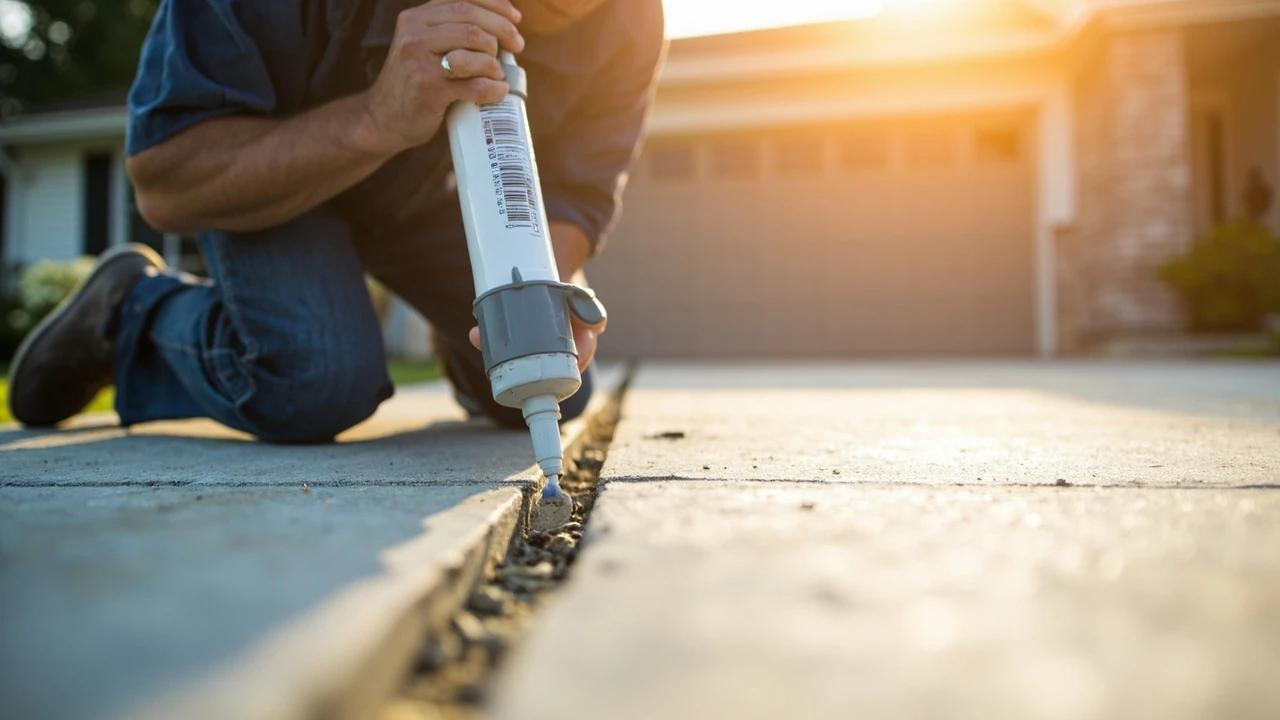
Gun flexible sealant into medium cracks
Load the polyurethane sealant in a caulk gun, cut the tip to match the crack width, and fill each crack flush in one steady pass. Self-leveling formulas flow flat on their own — just do not overfill, because they keep spreading for several minutes. Non-sag formulas (for sloped driveways) get tooled flat with a putty knife dipped in soapy water.

While the sealant is tacky, sprinkle dry play sand over the bead — it kills the glossy caulk-line look and blends the repair into the broom texture of the slab.
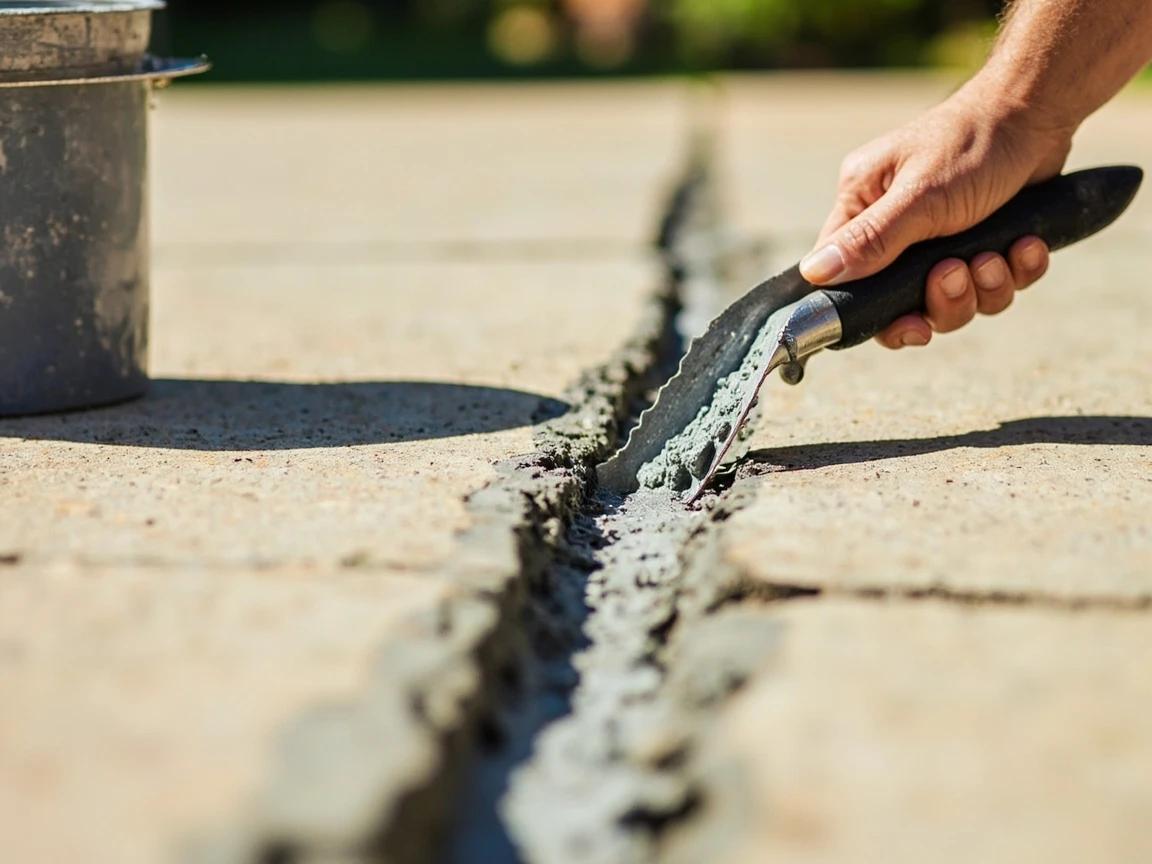
Trowel vinyl patcher into wide or crumbling cracks
Mix vinyl concrete patching compound to a peanut-butter consistency, dampen the crack (no standing water), and press the patcher in firmly with a margin trowel, working it into the undercut edges before overfilling slightly. Strike it off flush with the surrounding slab, then feather the edges with the trowel. Build deep repairs in layers no thicker than about 1/2 inch, letting each layer stiffen before the next.
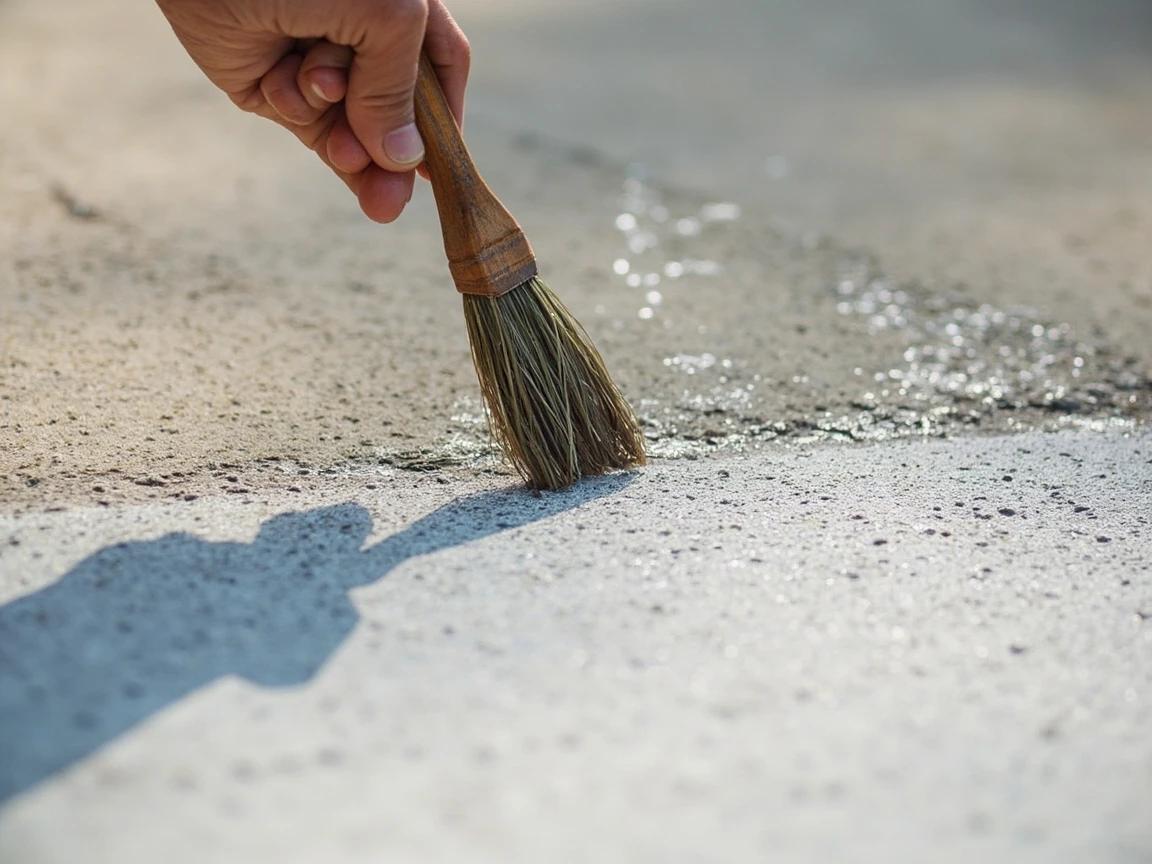
Texture the patch and let everything cure
Before the patcher stiffens, match the driveway's finish: drag a dry paintbrush or push broom lightly across the repair to mimic a broom finish, or dab with a sponge for a lighter texture. Then respect the cure times — typically a few hours before rain matters, 24 hours for foot traffic, and 48 to 72 hours before parking a car on any repair. Cool or humid weather stretches all of these.
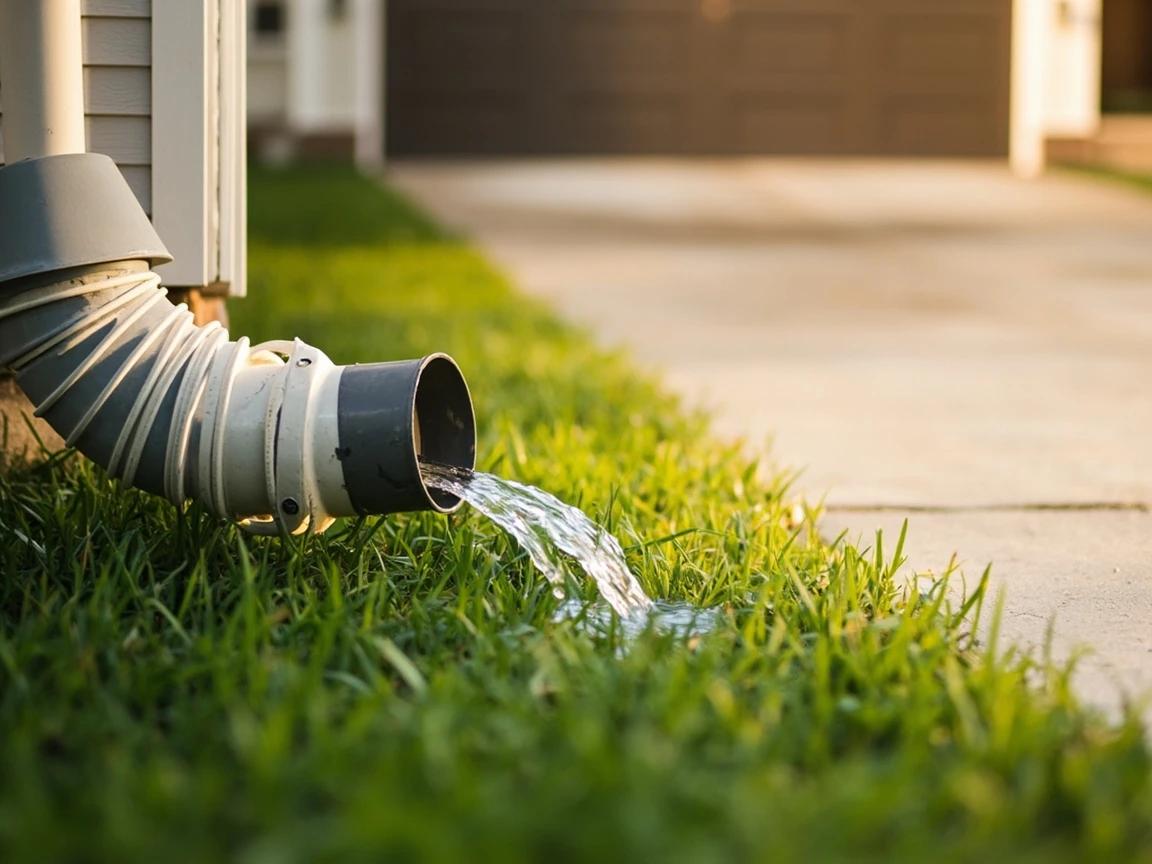
Fix the water problem that opened the cracks
Cracks are a symptom; water is usually the disease. Check where your downspouts discharge — a gutter dumping at the driveway edge washes out the gravel base and guarantees new cracks, so extend or replace the downspout to carry water at least 4 to 6 feet away. Re-seal the whole driveway with a penetrating concrete sealer every few years, and top off the caulk in the control joints (the straight grooves) — those joints exist precisely so the slab cracks there instead of somewhere you care about.
Frequently Asked Questions
What is the best filler for concrete driveway cracks?
+
For most cracks up to about 1/2 inch, a polyurethane concrete crack sealant beats everything else outdoors: it stays flexible through freeze-thaw cycles, bonds tenaciously, and tolerates UV. Self-leveling versions flow flat on horizontal cracks; non-sag versions suit sloped driveways. Rigid fillers and cement slurries in a moving crack just crack again beside the repair.
Can I use regular caulk on concrete cracks?
+
No — painter's acrylic caulk and bathroom silicone both fail fast outdoors. Acrylic shrinks, hardens, and pops out with the first freeze; silicone won't accept the sand texturing that hides a repair and degrades under tire traffic. Use a sealant labeled for concrete and masonry, polyurethane or a polyurethane hybrid, rated for exterior horizontal joints.
Why does my concrete driveway keep cracking?
+
Concrete cracks for two honest reasons: shrinkage as it cures (harmless hairlines) and movement underneath it. Water freezing inside existing cracks wedges them wider each winter, downspouts dumping at the slab edge wash out the gravel base, tree roots heave from below, and expansive clay soils swell and shrink seasonally. Sealing cracks promptly and moving roof water away from the slab stops most of the cycle.
When is a cracked driveway beyond repair?
+
Three patterns say replace or re-level rather than patch: interconnected map or alligator cracking across large areas (the base underneath has failed — surface repairs are cosmetic), slabs offset in height at the cracks (settlement, a trip hazard patching cannot fix), and damage covering more than roughly a quarter of the surface, where repair cost approaches replacement value. Isolated cracks, even long ones, are fair game for DIY.
How long before I can drive on a patched crack?
+
Most polyurethane sealants skin over in a few hours and take vehicle traffic in 24 to 48 hours; vinyl patching compounds typically want 24 hours foot traffic and 72 hours before cars, longer in cool or humid weather. Check the cure schedule on your specific product — driving early is how a clean repair gets tire-tracked into a permanent scar.
Community Tips
💬 Sign in to share tips with the community
Sources & further reading
- Repairing Cracks in Concrete — Quikrete
- How to Fill, Seal & Caulk Concrete Cracks — A-1 Concrete Leveling
- How to Repair Cracks in a Concrete Driveway — A-1 Concrete Leveling
More Roofing & Siding Guides
View all → Medium3 hrs
How to Power Wash a House Exterior
A season of pollen, algae, and road film ages a house faster than anything else you can fix in an afternoon — and a rented pressure washer erases it for about the cost of a pizza night, versus $300-600 for a wash crew. The technique is the whole game: the right tip and pressure for your siding, soap from the bottom up, rinse from the top down, and never, ever spray upward under the laps. This guide covers the full wash plus the surfaces you should not blast at all.
 Easy1h 30m
How to Replace a Downspout
A crushed, leaking, or detached downspout dumps roof water right at your foundation — the single most common cause of wet basements — and replacing one is among the easiest exterior repairs there is. Parts are standard at any home center ($25-60 for a typical run with elbows and straps), the only real tools are a hacksaw and a drill, and the whole swap takes about 90 minutes. The trick that separates a dry wall from a streaky one is assembly order: every upper piece slips INSIDE the piece below it.
 Medium3 hrs
How to Install Gutter Guards
Cleaning gutters twice a year is the chore gutter guards exist to kill — and the snap-in screen and micro-mesh panels at any home center install with basic tools for $1-3 per linear foot, versus $1,500+ for a professionally installed system. The job is genuinely DIY-able on a single-story home: clean the gutters, fit and fasten the panels, and test with a hose. This guide covers choosing the right guard type, the ladder setup that keeps you safe, and the one installation mistake (tucking guards under shingles) that can void a roof warranty.
You Might Also Like
 Medium2 hrs
How to Patch a Large Hole in Drywall
A doorknob blowout, a wall-anchor failure, a fist through the drywall during the move-out — these holes are too big for spackle but too small to justify cutting in a full drywall section. The mesh patch (for 1/2-inch to 4-inch holes) and the California patch (for 4 to 8-inch holes) both finish flush, paint over invisibly, and cost under $25 in materials. The job takes about two hours of hands-on work spread over two or three days of compound cure time.
 Easy30 min
How to Replace an Electrical Outlet
A worn-out or discolored electrical outlet is one of the simplest electrical repairs you can tackle yourself — swapping one takes about 15-30 minutes and costs under $5 in parts versus $75-150 for an electrician visit. This guide walks you through safely replacing a standard duplex receptacle, including how to handle the wiring correctly and avoid the most common DIY mistakes.
 Medium45 min
How to Install a Ceiling Fan
Replacing a light fixture with a ceiling fan improves air circulation in summer and can reduce heating costs in winter by circulating warm ceiling air downward. Most installs take 45-60 minutes.