How to Repair Vinyl Siding

Cracked, holed, or loose vinyl siding panels let moisture behind the wall sheathing where it causes mold, rot, and insect damage — problems that cost thousands to fix if ignored. Replacing a single damaged panel is a straightforward 45-minute job once you own a $5 zip tool, and patching small holes takes even less time. This guide covers both patch repairs for holes under an inch and full panel replacement, so you can match the fix to the damage.
What You'll Need
🛠 Tools
📦 Materials
Safety First
- •Wear safety glasses when cutting vinyl — snips and saws throw sharp fragments.
- •Vinyl becomes brittle below 40°F and cracks easily — schedule repairs for mild weather above 50°F.
- •Use a properly rated ladder on firm, level ground if the damaged panel is above reach height. Never lean a ladder against vinyl siding — it will crack.
Step-by-Step Instructions
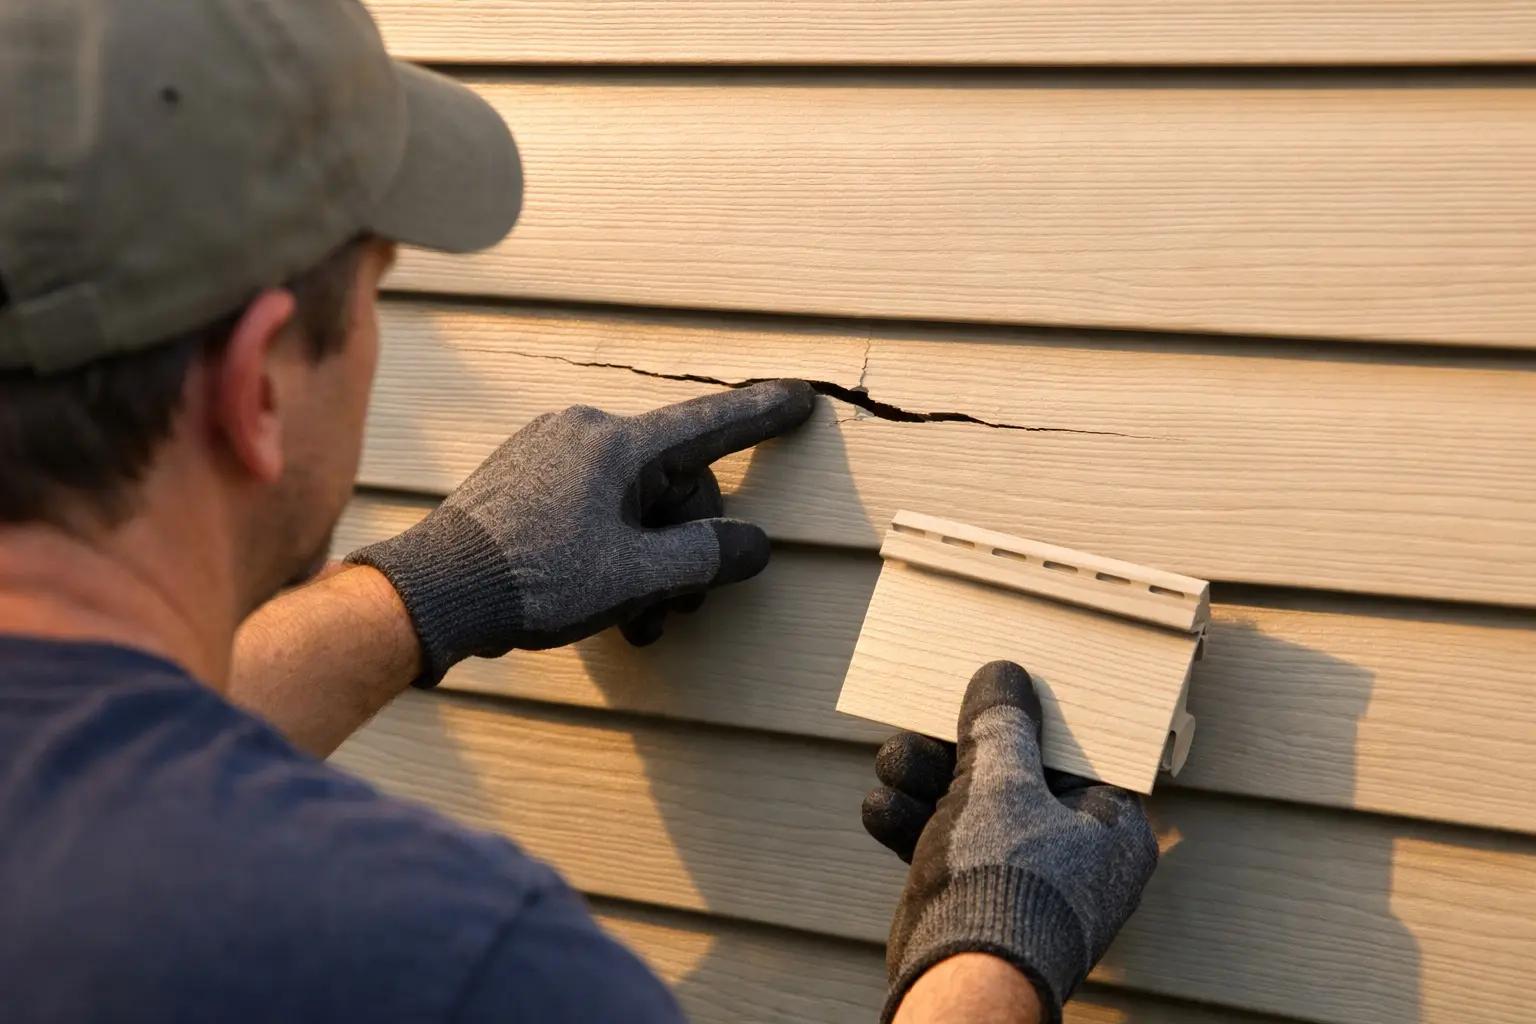
Assess the Damage and Gather a Matching Panel
Inspect the damaged area to decide the right repair method. Holes smaller than 1 inch can be patched with exterior filler in place. Cracks longer than a few inches or panels that are warped, buckled, or shattered need a full panel replacement. For replacement, you need a panel that matches your existing siding's profile (the shape of the horizontal lip and the exposure width) and color. Take a small cut-off piece or a clear photo to the home center — vinyl siding profiles are not interchangeable between manufacturers.
If you can't find a color match at the store, check the less visible sides of your house — you can swap a panel from the back or side wall to the front and put the slightly off-color replacement where it won't be noticed.
Patch Small Holes with Exterior Filler
For holes under 1 inch, clean the area with warm soapy water and let it dry for at least two hours. Lightly sand a quarter-inch border around the hole with 220-grit sandpaper to degloss the factory finish — this helps the filler grip. Apply exterior vinyl patch filler with a plastic putty knife, slightly overfilling the hole. Let it cure per the product label (usually 2-4 hours), then sand flush with 220-grit. If the color doesn't match perfectly, apply exterior paint rated for vinyl surfaces.
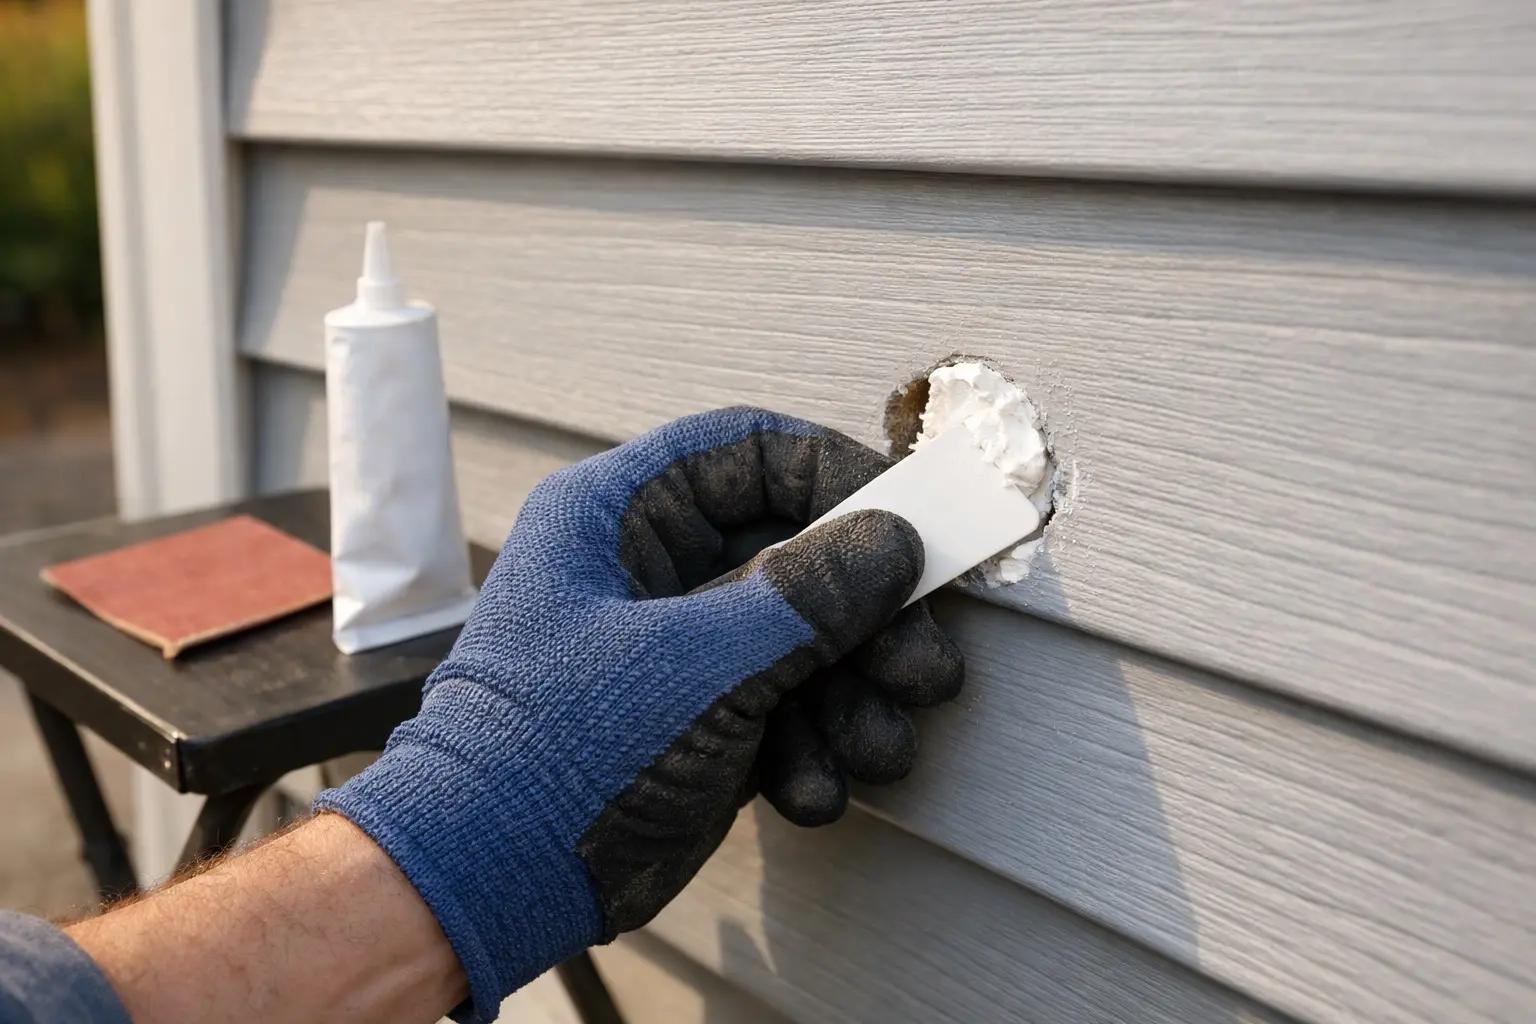
Use a plastic putty knife, not metal — metal edges can gouge the soft vinyl surface around the patch and create a visible mark.
Unlock the Damaged Panel with the Zip Tool
For full panel replacement, start by unlocking the panel directly above the damaged one. Slide the curved hook of the zip tool up under the bottom lip of the upper panel until you feel it catch the locking ridge. Pull the zip tool down and toward you while sliding it horizontally along the length of the panel — this unzips the interlock and frees the upper panel's bottom edge. Once separated, fold the upper panel up out of the way to expose the nailing strip of the damaged panel below it.
Pull gently and steadily — yanking the zip tool can crack the panel above, turning a one-panel repair into two.
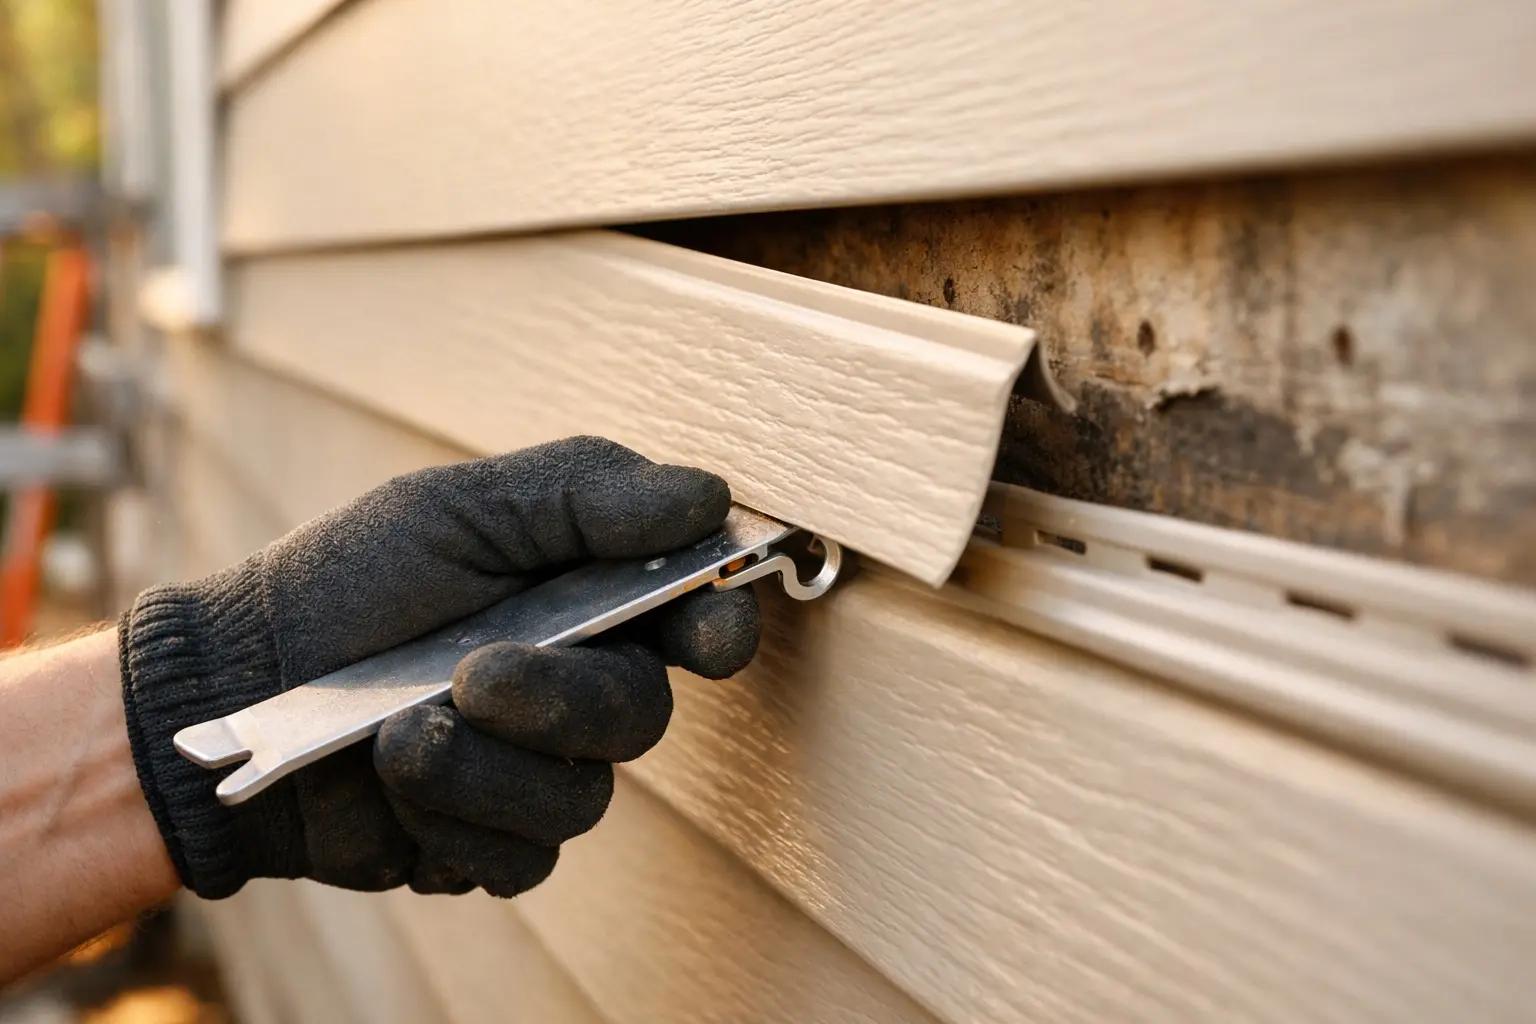
Remove the Nails and Pull Out the Damaged Panel
With the upper panel folded up, you'll see the nailing strip (the flat flange with oval slots) of the damaged panel nailed to the wall sheathing. Slide a flat pry bar under each nail head and lever it out. Vinyl siding typically has nails every 16 inches along the strip. Once all nails are removed, pull the damaged panel down and out — the bottom lip will disengage from the panel below it. Count the nails and note their spacing so you can replicate it on the replacement.
Measure and Cut the Replacement Panel
Measure the length of the opening and add 2 inches on each side for overlap — vinyl panels need room to slide past their neighbors for a weathertight joint. Transfer the measurement to the replacement panel and mark a cut line with a chalk line or straight edge. Cut with tin snips for short cuts (under 12 inches) or score-and-snap with a utility knife for full-length cuts: score the face deeply along your mark, bend the panel away from the score, and it will snap cleanly. For the nailing strip end, use tin snips to cut the slots.
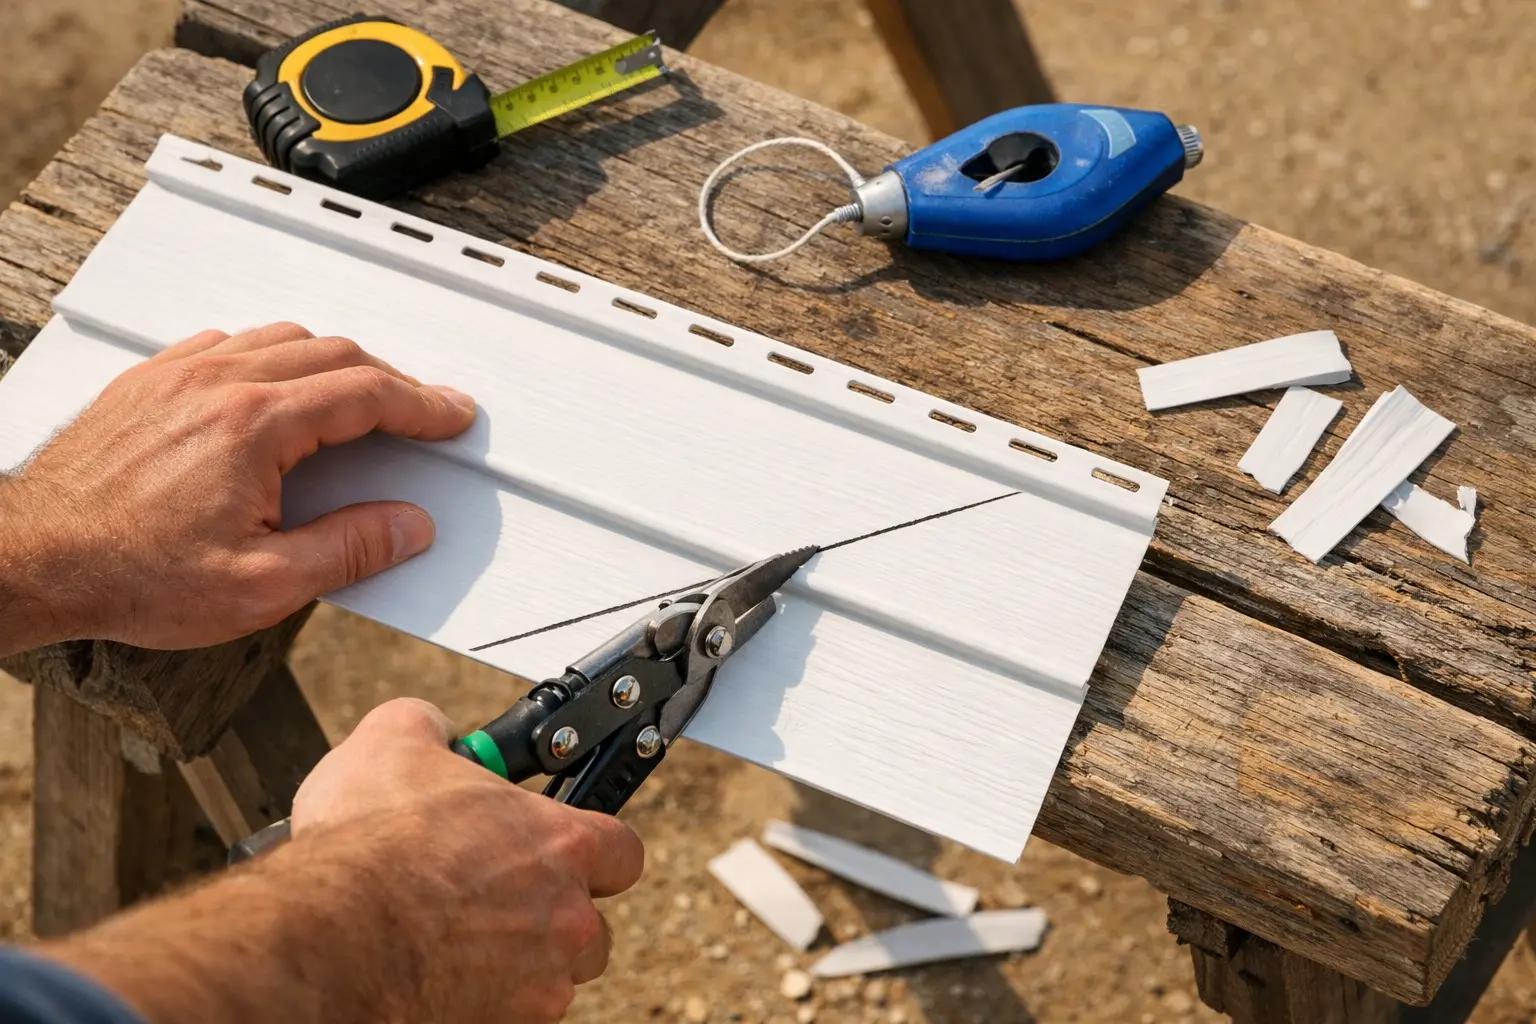
For most cuts, tin snips or a score-and-snap with a utility knife are safest. If you use a circular saw, fit a fine-tooth blade (40+ teeth) and run it in the normal direction. Some installers reverse the blade for a cleaner edge on vinyl, but a backwards blade sharply increases kickback and the chance of teeth shattering — it is not a manufacturer-approved technique, so skip it unless you are experienced and wearing full eye and face protection.
Install the Replacement Panel
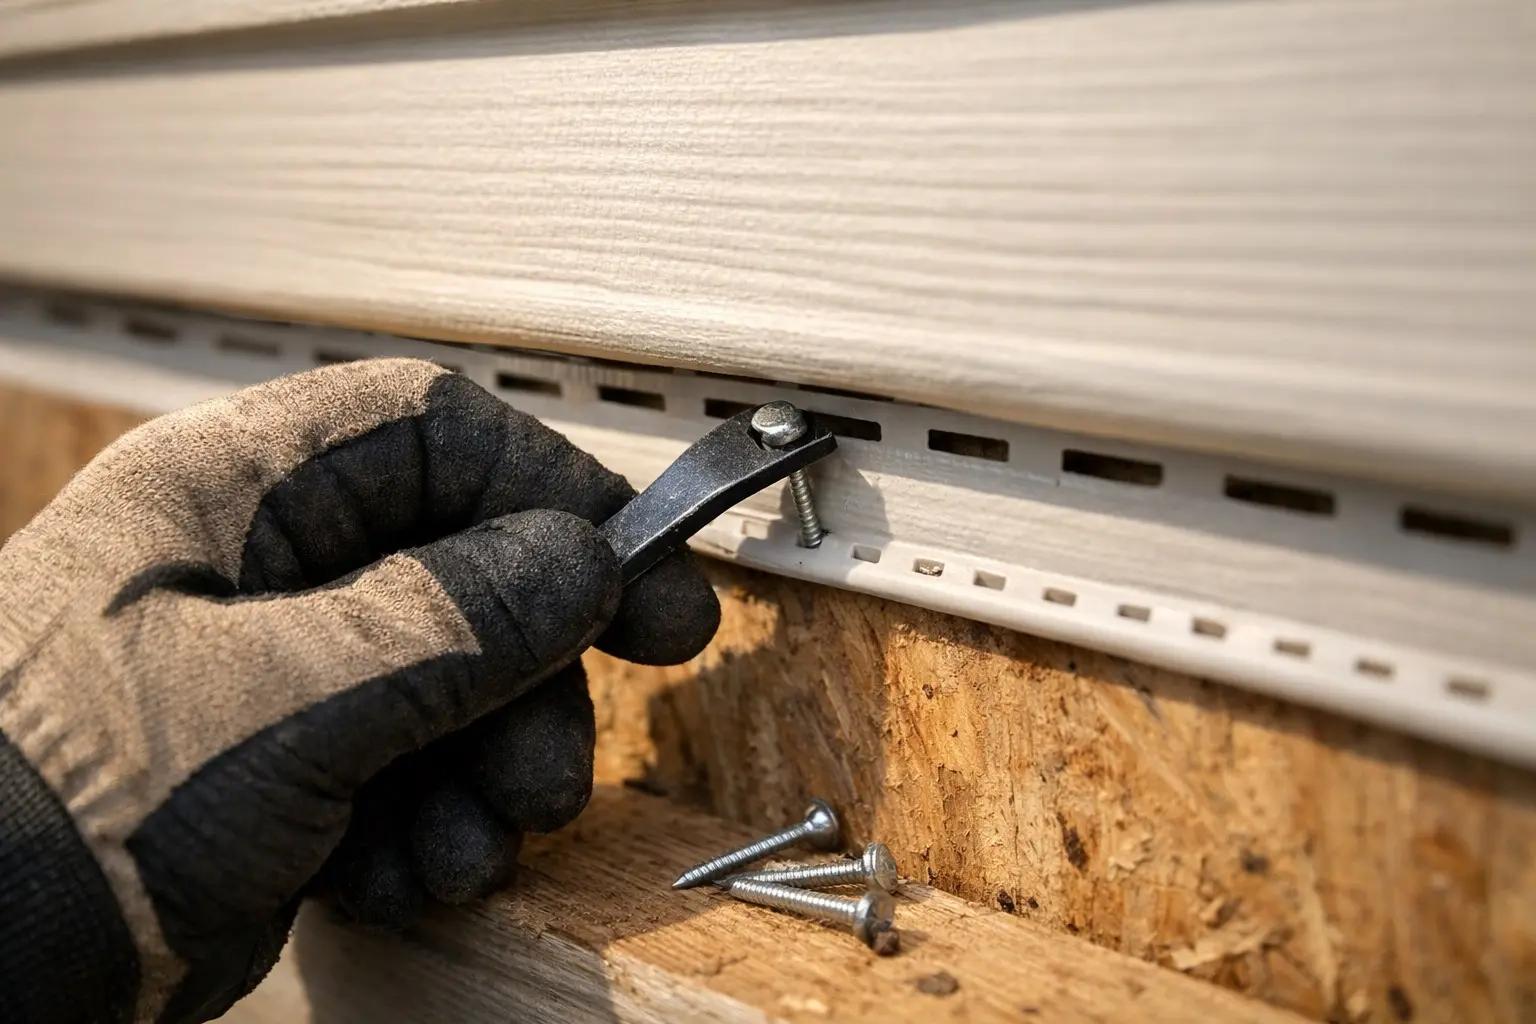
Hook the bottom lip of the replacement panel onto the locking ridge of the panel below it — you'll feel and hear it snap into place. Push the panel flat against the wall and align the nailing strip slots with the wall studs or existing nail holes. Drive 1-1/2-inch galvanized roofing nails through the center of each nailing slot, spacing them every 16 inches. Leave approximately 1/32 inch (the thickness of a dime) between the nail head and the nailing strip — never drive nails tight against the vinyl.
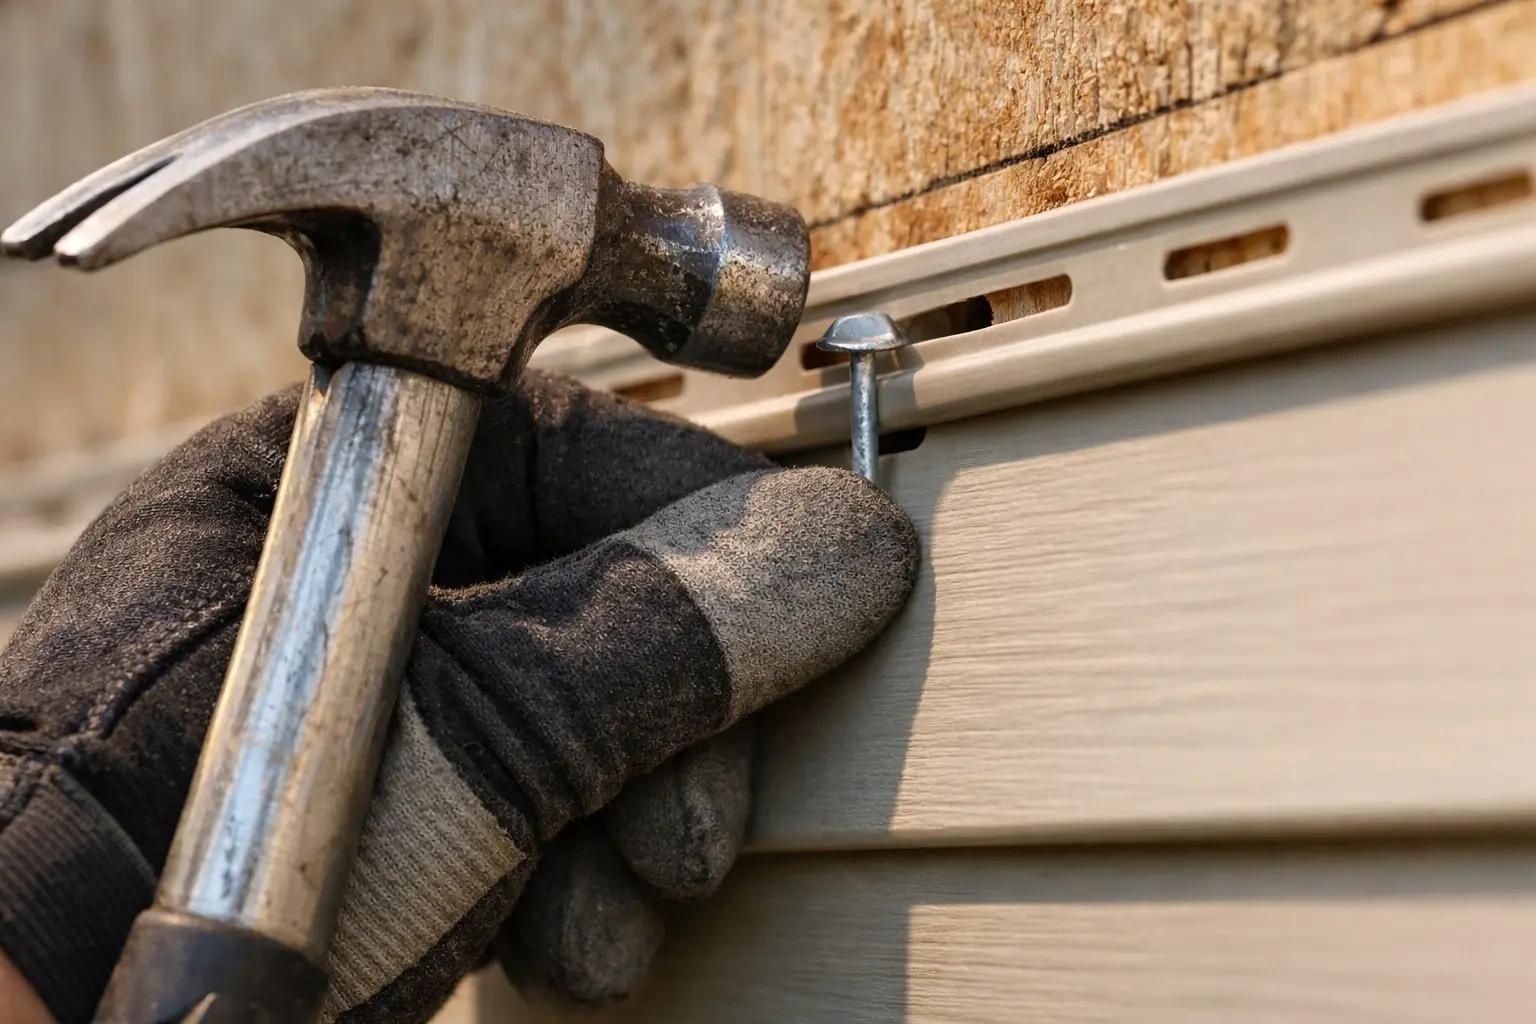
Never nail tight — vinyl expands and contracts up to 1/2 inch over a 12-foot panel with temperature changes. Tight nails cause buckling and warping that's obvious and expensive to fix.
Lock the Upper Panel Back Into Place
Fold the upper panel back down over the nailing strip of the new panel. Starting at one end, use the zip tool to hook the bottom lip of the upper panel and push it down onto the locking ridge of the replacement panel. Slide the zip tool along the full length of the seam, pressing the vinyl in just behind the tool so it snaps securely into the lock. You should hear a faint click as the interlock engages. Run your hand along the seam to confirm there are no gaps or sections that didn't lock.
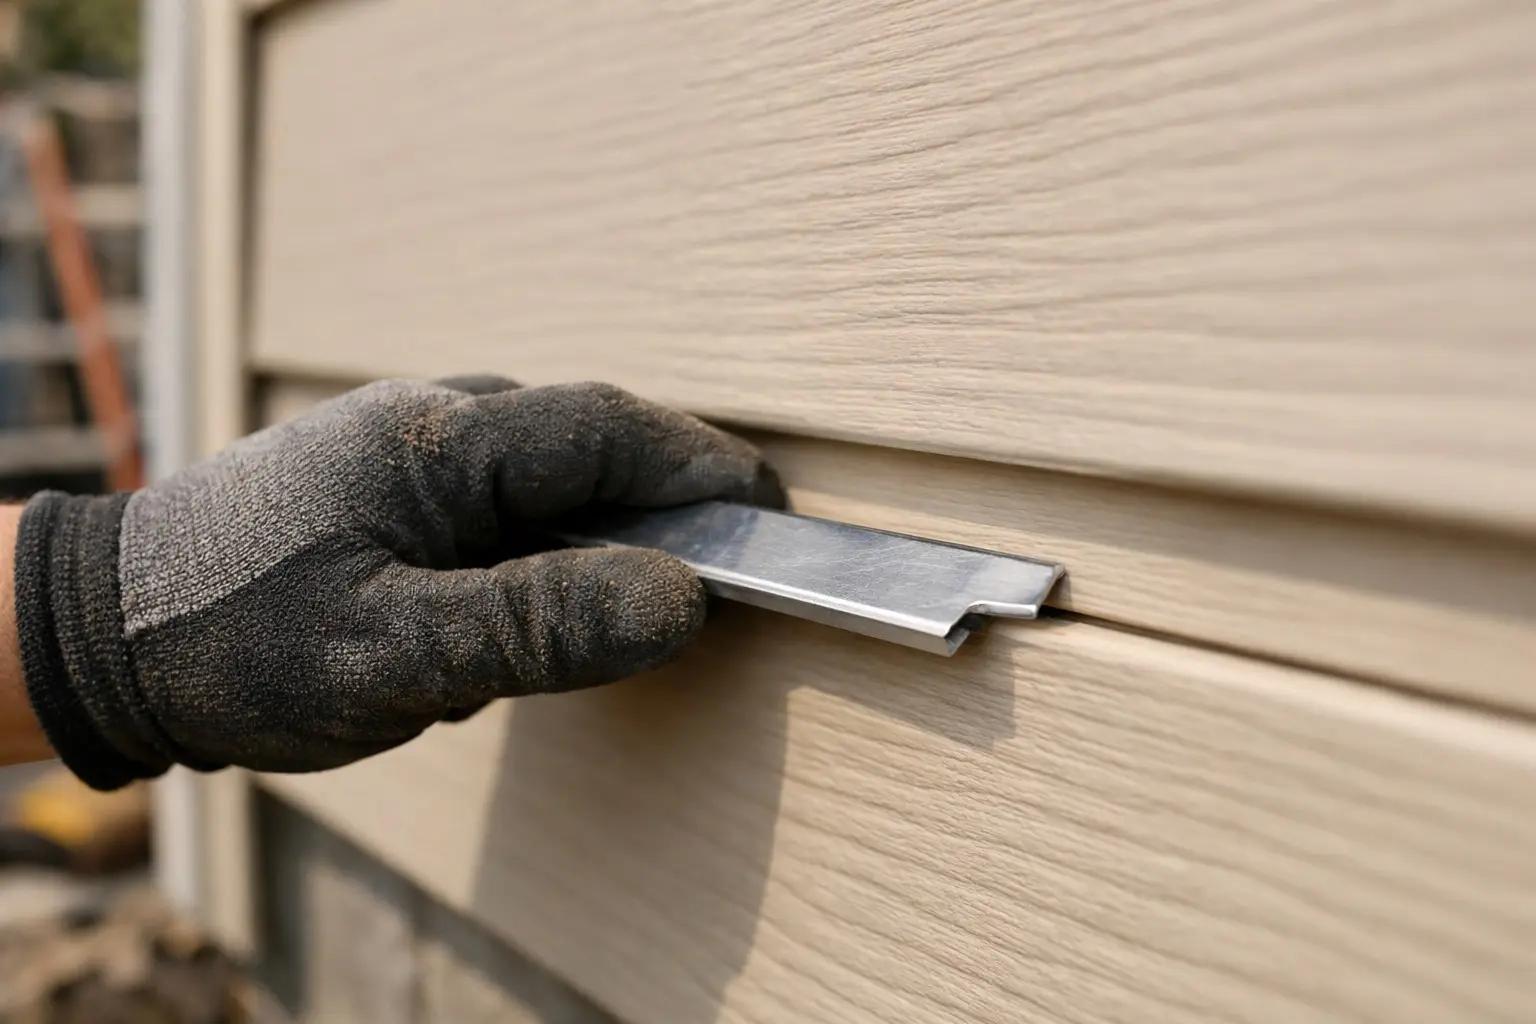
Work on a warm afternoon if possible — vinyl above 60°F is flexible and locks together easily. In cold weather, the panels are stiff and the lock can resist snapping shut.
Seal the Overlap Joints and Inspect the Repair
Apply a thin bead of exterior-grade caulk at the vertical overlap joints where the replacement panel meets the existing panels on either side. Smooth the caulk with a damp finger to create a clean, flush seal. Step back 10-15 feet and inspect the repair from viewing distance — the panel should sit flat with even shadow lines at each course, and the color should be close to the surrounding panels. Check that the panel slides freely side-to-side about 1/4 inch, confirming the nails aren't too tight.

Frequently Asked Questions
Can vinyl siding be repaired without replacing the whole panel?
+
Yes — for holes smaller than 1 inch, you can patch with exterior vinyl filler in place: clean the area, lightly sand a 1/4-inch border with 220-grit, fill, sand flush, and color-match with vinyl-rated paint. Cracks longer than a few inches and warped panels need full replacement using a zip tool.
What is a vinyl siding zip tool and do I really need one?
+
A zip tool is a $5 hooked metal blade that unlocks the bottom lip of a vinyl siding panel from the panel above it. You absolutely need one for any panel replacement — without it you'll crack the surrounding panels trying to pry them apart. Available at any hardware store under "vinyl siding unlocking tool" or "zip tool."
Why does my vinyl siding crack when I try to repair it?
+
Vinyl becomes brittle below 40°F and snaps under pressure. Wait for a mild day above 50°F (ideally 60-80°F) when the panels are flexible. Working in cold weather is the #1 cause of small repair jobs turning into multi-panel replacements.
How tight should I drive the nails on a replacement vinyl panel?
+
Leave roughly 1/32 inch (the thickness of a dime) between the nail head and the nailing strip — never drive nails tight against the vinyl. Vinyl expands and contracts up to 1/2 inch over a 12-foot panel with temperature changes; tight nails cause obvious buckling and warping that's visible from the curb.
How do I match the color of an old vinyl siding panel?
+
Take a small cut-off piece or a clear photo to a home improvement store with a wide vinyl selection (Home Depot, Lowe's, or a dedicated siding supplier). If the original color is faded or discontinued, swap a panel from a less visible side of the house (rear or far gable) to the front, and put the slightly mismatched replacement in the hidden spot.
Community Tips
💬 Sign in to share tips with the community
Sources & further reading
- How To Replace Damaged Vinyl Siding — This Old House
- Vinyl Siding Installation Manual — Vinyl Siding Institute
More Roofing & Siding Guides
View all → Medium2 hrs
How to Patch Cracks in a Concrete Driveway
Every crack in a concrete driveway is a water channel, and every winter that water freezes, expands, and pries the crack wider — which is why a $15 tube of polyurethane sealant today beats a $5,000 replacement in five years. The fix depends entirely on crack width: pourable filler for hairlines, backer rod and flexible caulk for the middle sizes, vinyl patcher for wide or crumbling sections. This guide sorts your cracks into the right bucket and walks each repair start to finish.
 Medium3 hrs
How to Power Wash a House Exterior
A season of pollen, algae, and road film ages a house faster than anything else you can fix in an afternoon — and a rented pressure washer erases it for about the cost of a pizza night, versus $300-600 for a wash crew. The technique is the whole game: the right tip and pressure for your siding, soap from the bottom up, rinse from the top down, and never, ever spray upward under the laps. This guide covers the full wash plus the surfaces you should not blast at all.
 Easy1h 30m
How to Replace a Downspout
A crushed, leaking, or detached downspout dumps roof water right at your foundation — the single most common cause of wet basements — and replacing one is among the easiest exterior repairs there is. Parts are standard at any home center ($25-60 for a typical run with elbows and straps), the only real tools are a hacksaw and a drill, and the whole swap takes about 90 minutes. The trick that separates a dry wall from a streaky one is assembly order: every upper piece slips INSIDE the piece below it.
You Might Also Like
 Easy3 hrs
Spring Lawn Care Checklist
What you do to your lawn in the first six weeks of spring determines its health for the entire growing season. Follow this sequence to fix winter damage, encourage deep roots, and crowd out weeds before they establish.
 Easy1 hr
How to Start a Compost Bin
Composting converts kitchen scraps and yard waste into rich, free fertilizer that dramatically improves garden soil. Setup takes under an hour and once running, the bin requires minimal effort for big rewards.
 Medium2 hrs
How to Prune Fruit Trees
Regular pruning is the most important annual task for fruit tree health and productivity. Properly pruned trees produce larger, higher-quality fruit, resist disease better, and live significantly longer than unpruned trees.