How to Install Gutter Guards

Cleaning gutters twice a year is the chore gutter guards exist to kill — and the snap-in screen and micro-mesh panels at any home center install with basic tools for $1-3 per linear foot, versus $1,500+ for a professionally installed system. The job is genuinely DIY-able on a single-story home: clean the gutters, fit and fasten the panels, and test with a hose. This guide covers choosing the right guard type, the ladder setup that keeps you safe, and the one installation mistake (tucking guards under shingles) that can void a roof warranty.
What You'll Need
🛠 Tools
📦 Materials
Safety First
- •Ladder falls are the real danger of this job. Use an extension ladder with a stabilizer bar (never lean the ladder on the gutter itself), set it at the 4-to-1 angle on firm level ground, keep three points of contact, and have a helper foot the ladder. Stay off the ladder entirely in wind or rain.
- •Look up before you set up: keep yourself and the ladder at least 10 feet from any overhead power line, including the service drop where wires attach to the house.
- •Wear cut-resistant gloves and safety glasses — gutter edges and freshly cut guard panels are razor-sharp, and dried debris flicks into eyes.
- •Don't slide guards under your shingles unless the manufacturer explicitly requires it. Lifting or fastening through shingles can break their seal and void the roof warranty — choose panels that mount to the gutter itself.
Step-by-Step Instructions
Choose the Right Guard Type for Your Debris
Match the guard to what actually falls on your roof. Stainless micro-mesh on a rigid aluminum frame blocks everything down to shingle grit and pine needles — the best all-around DIY choice. Stamped metal screens cost less and handle broad leaves fine, but let needles and seeds through. Foam and brush inserts just press into the gutter (no fasteners at all) but clog faster and need replacing every 2-3 years. Skip reverse-curve hood systems for DIY — they're dealer-installed and priced like it.
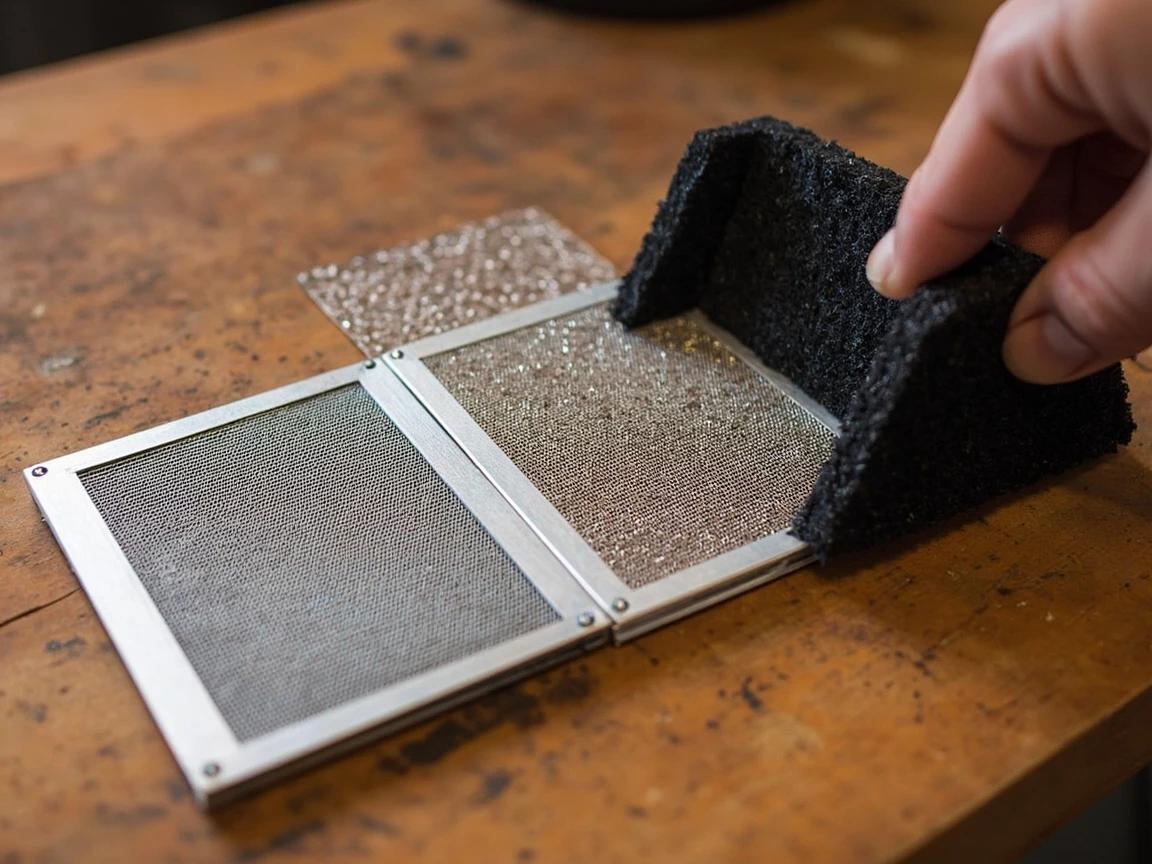
Lots of evergreens nearby? That settles it: only micro-mesh keeps pine needles out. Screens and foam both let needles weave through and you'll be cleaning again by fall.
Measure Your Gutters and Buy 10% Extra
Measure the total length of every gutter run and note the gutter width — most homes have 5-inch K-style gutters, larger roofs sometimes 6-inch, and panels are sized to match. Count inside and outside corners, since you'll cut panels to meet there. Buy about 10% extra length to cover cuts, mistakes, and the odd short fill piece; panels typically come in 3- or 4-foot sections.

Width matters more than people expect — a 5-inch panel on a 6-inch gutter leaves a gap that feeds debris straight in. Measure across the top opening of the gutter, not the bottom.
Set Up the Ladder Safely
Set an extension ladder on firm, level ground at the 4-to-1 angle (one foot out from the wall for every four feet of height) and fit a stabilizer bar so the ladder bears on the roof or wall — never on the gutter, which dents and tears loose under load. Keep three points of contact, work within arm's reach instead of leaning, and climb down to move the ladder every few feet. A helper footing the ladder and passing up panels makes this job twice as fast and ten times safer.
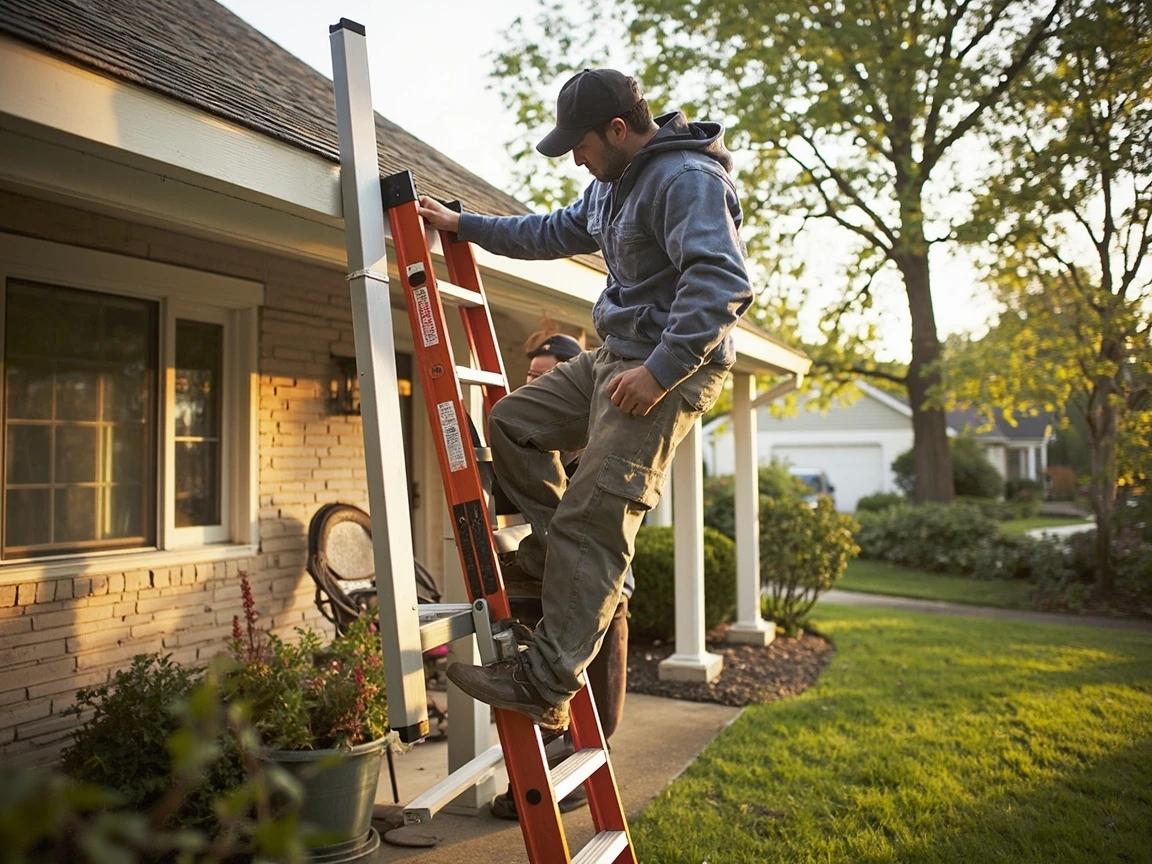
Stay at least 10 feet from overhead power lines, including the service drop to the house. If any gutter run is near the lines, leave that section to a pro.
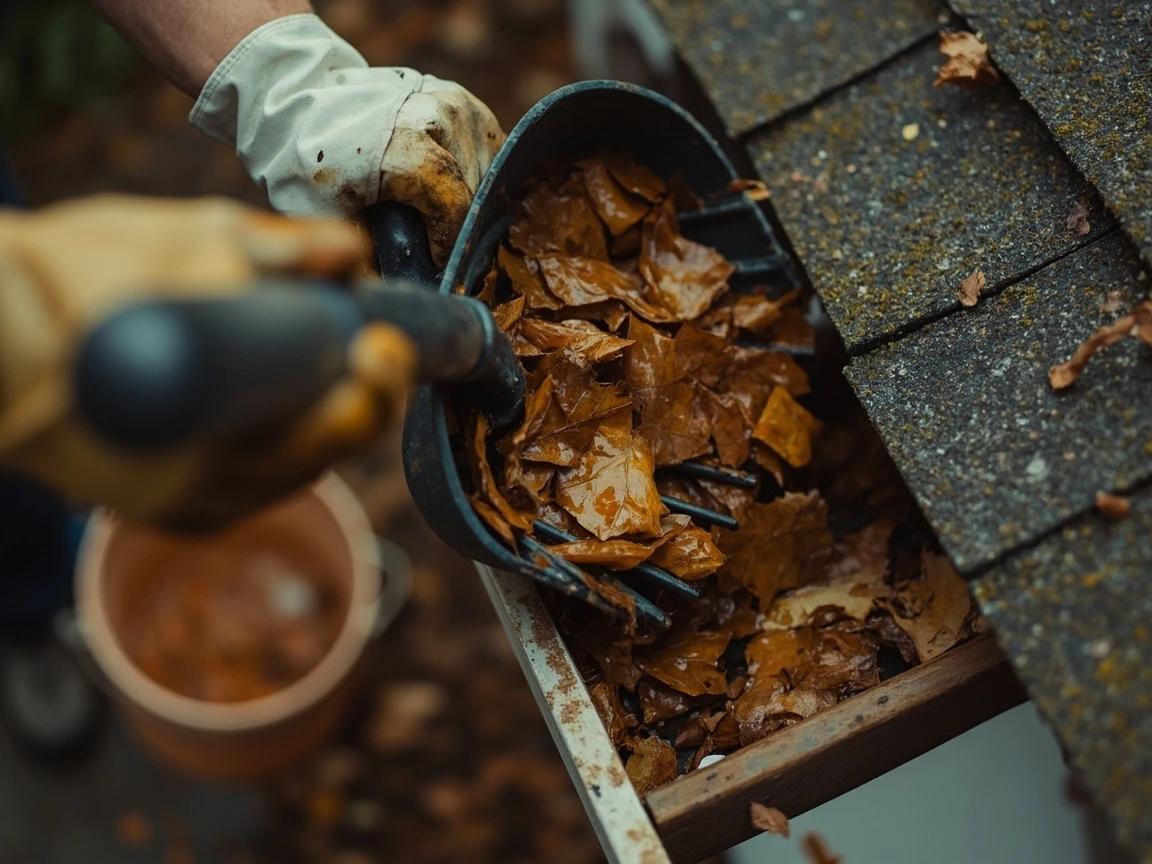
Clean the Gutters and Flush the Downspouts
Guards over dirty gutters just seal the problem in. Scoop out leaves and sludge with a gutter scoop into a hooked bucket, then flush each run with a hose toward the downspout and watch the water exit at the bottom. A downspout that backs up needs clearing now — feed the hose up from the bottom at full pressure, or use a plumber's snake — because you will not want to pull new guards off to do it later.
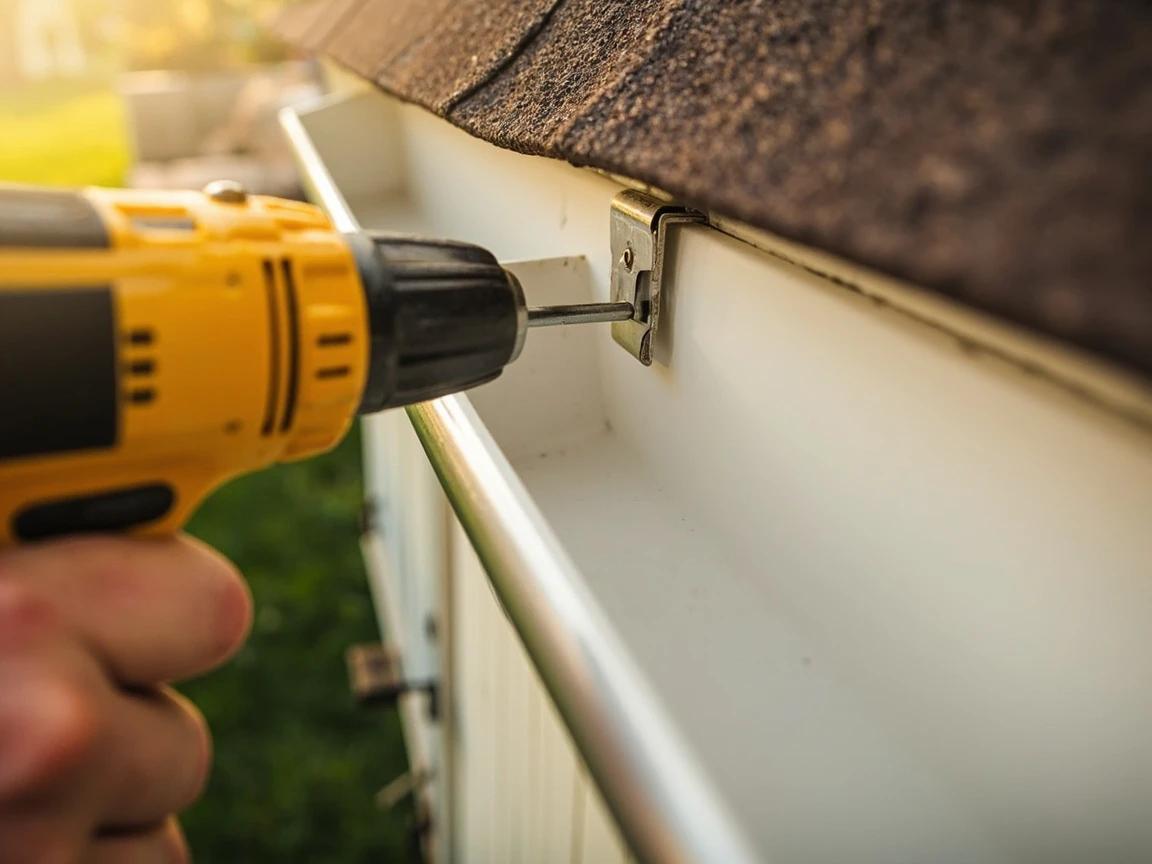
Inspect and Re-Secure the Gutters First
With the gutters empty, check what the guards are about to lock in place. Water should drain fully toward the downspouts — standing water means the run is out of slope and needs re-pitching. Tighten or add hidden hangers anywhere the gutter flexes or pulls away from the fascia (hangers every 24 inches is the standard), and re-seal leaky end caps and seams with gutter sealant. Probe the fascia board behind any stained section; soft wood is rot that needs repair before guards go on.
Run the hose one more time after tightening hangers: water should sheet toward the downspout with no pooling. Five minutes of slope-checking now is the difference between guards that work and a covered birdbath.
Cut and Fit the Panels
Start at a corner or end cap and dry-fit the first panel. Most snap-in screen and micro-mesh panels rest their front edge on the gutter's outer lip and their back edge against the fascia or under the drip edge — without lifting the shingles. Cut panels to length with tin snips, and notch around gutter hangers, outlet drops, and corners as you go. At inside and outside corners, miter-cut two panels to meet cleanly rather than leaving a gap.
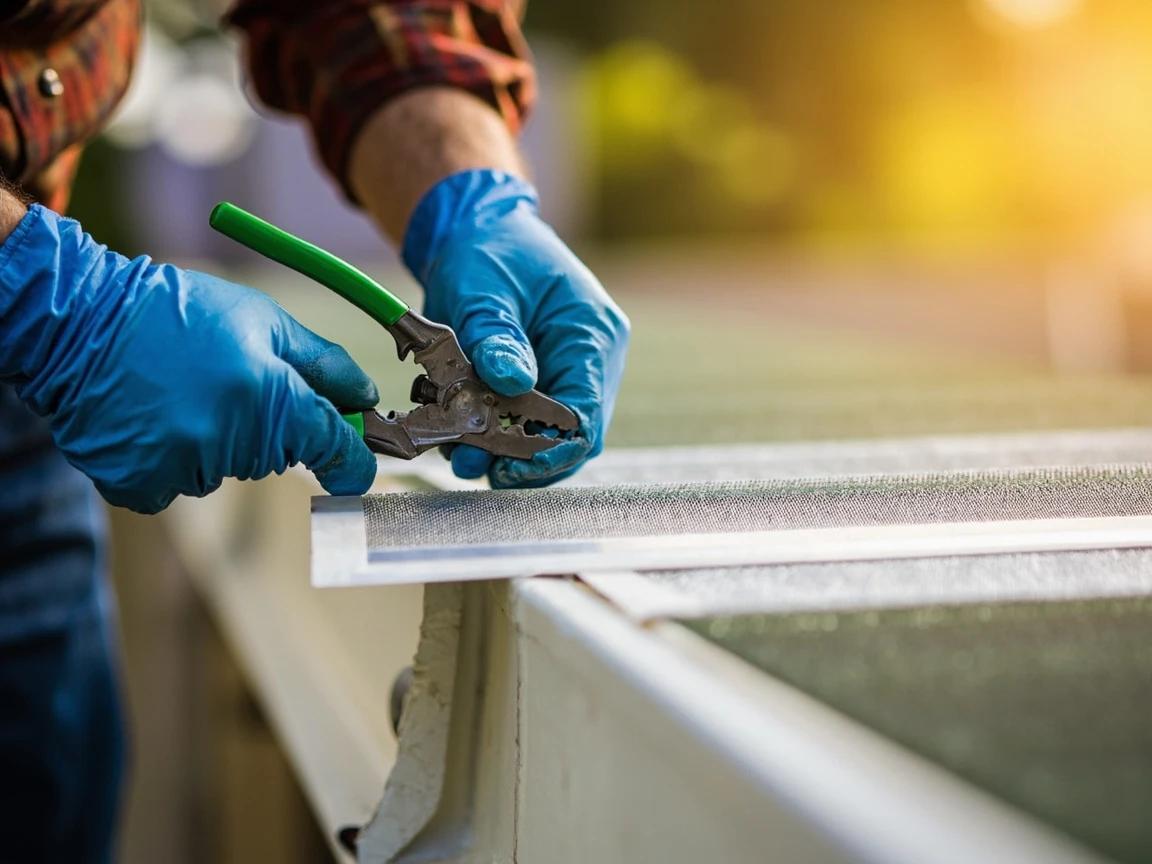
Resist tucking the rear edge under the shingles unless your specific product's instructions require it and your roofing warranty allows it. Breaking the shingles' adhesive seal invites wind damage and leaks, and voids many warranties.
Fasten the Panels and Overlap the Seams
Secure each panel per the product's design: most micro-mesh frames take a self-tapping metal screw (hex-head zip screw, not a wood/deck screw — those will rust and split the aluminum gutter lip) through the front edge into the gutter lip every couple of feet, while many screens snap or clip in with no fasteners. Overlap adjacent panels about an inch (or use the built-in interlock) so debris can't thread between sections, and keep the panels pitched slightly toward the gutter front so water sheds across the mesh instead of pooling against the fascia.

Hose-Test the Finished Runs
Before you put the ladder away, spray each run with the hose at roof angle and watch: water should pass through the mesh and exit the downspouts, with no overshooting the gutter front and no waterfall behind the gutter at the fascia. Overshoot usually means a panel is pitched too flat or sits proud of the gutter lip — reseat it. Then check the panels are firm under light hand pressure so wind and snow can't dislodge them.

Recheck the system after the first real storm. The first heavy rain reveals any panel that needs reseating while the fix is still a five-minute job.
Know the New Maintenance Routine
Guards change gutter maintenance; they don't eliminate it. Once or twice a year — and after big storms — walk the house and brush accumulated grit, pollen, and needles off the panel tops with a soft brush or leaf blower, and confirm downspouts still flow in a hard rain. Foam and brush inserts are the exception: plan to pull and replace those every 2-3 years as they break down. Keep your leftover panels; they make future repairs a two-minute swap.

Frequently Asked Questions
Do gutter guards really work, or will I still have to clean my gutters?
+
Good guards stop the leaves and twigs that cause clogs, but no guard ends maintenance entirely. Fine debris — shingle grit, pollen, seeds — still accumulates on top of mesh, so plan to brush the panels off once or twice a year and check that water is flowing. That's a 20-minute walk-around instead of scooping muck, which is exactly the trade you're buying.
Will gutter guards void my roof warranty?
+
They can if installed wrong. Guards that slide under the first course of shingles can break the shingle seal or trap moisture, and fastening anything through the shingles is an automatic warranty problem with most manufacturers. Choose panels that clip or screw to the gutter itself, and if a product's instructions require going under the shingles, check your roofing warranty terms before buying it.
Which type of gutter guard is best?
+
For DIY value, stainless micro-mesh mounted on a rigid frame is the top performer — it blocks even pine needles and shingle grit. Simple metal screens cost less and stop leaves but let finer debris through. Foam and brush inserts are the easiest to install but clog sooner and need replacing every two to three years. Reverse-curve (surface-tension) systems work well but are professionally installed and cost several times more.
How much do gutter guards cost?
+
DIY screen and micro-mesh panels run about $1-3 per linear foot at home centers, so a typical 150-200 feet of gutter costs $150-600 in materials. Professional installation averages around $1,500 nationally, and premium reverse-curve systems can run $3-10+ per foot installed. The DIY route saves the most on single-story homes where ladder work is manageable.
Do I need to clean my gutters before installing guards?
+
Yes — always. Covering a dirty gutter seals the debris in, and the first heavy rain turns it into a clogged, overflowing trough you now have to open back up. Scoop the gutters, flush them with a hose, and confirm the downspouts run clear before a single panel goes on.
Community Tips
💬 Sign in to share tips with the community
Sources & further reading
- How To Install Gutter Guards: Step-by-Step Guide — This Old House
- How To Install Gutter Guards — Angi
- How Much Does a Gutter Guard Cost to Install? — Bob Vila
More Roofing & Siding Guides
View all → Easy1 hr
How to Inspect Your Roof for Damage
Most roof failures announce themselves months in advance — a few lifted shingles, a stripe of missing granules, a rust line on the flashing — to anyone who actually looks. The good news: you can catch nearly all of it from the ground with binoculars and from inside the attic with a flashlight, no roof-walking required. This free 60-minute inspection, done twice a year and after every big storm, is the difference between a $300 repair and a $12,000 replacement.
 Medium2 hrs
How to Seal Roof Flashing Leaks
When a roof leaks, the flashing — not the shingles — is the culprit most of the time: a cracked rubber vent boot, a lifted piece of step flashing, or a failed bead of sealant at the chimney. These are $10-40 fixes if you catch them early, versus thousands once water rots the decking below. This guide shows you how to trace the leak to its flashing, make the right repair with the right sealant (not a smear of roofing tar), and test it — plus the honest line between a walkable one-story repair and a roofer's job.
 Easy1h 30m
How to Replace a Downspout
A crushed, leaking, or detached downspout dumps roof water right at your foundation — the single most common cause of wet basements — and replacing one is among the easiest exterior repairs there is. Parts are standard at any home center ($25-60 for a typical run with elbows and straps), the only real tools are a hacksaw and a drill, and the whole swap takes about 90 minutes. The trick that separates a dry wall from a streaky one is assembly order: every upper piece slips INSIDE the piece below it.
You Might Also Like
 Easy25 min
Best Deck Stain: Transparent vs Semi vs Solid
There is no "best" deck stain — there is the right stain for your sun exposure, wood condition, and how often you want to redo the job. Transparent stains last 1-2 years but let the natural grain show. Solid stains last 4-7 years but look like paint. This guide walks the four opacity levels and the oil-vs-water choice so you pick the one that matches your deck and your tolerance for re-staining.
 Medium30 min
How to Troubleshoot a Microwave That Won't Heat
A microwave that runs — light on, turntable spinning, timer counting down — but leaves food stone cold is one of the most common appliance failures, and about half the time the cause is something you can fix in five minutes for free. This guide walks the diagnosis from the easy stuff (demo mode, power level, a tripped GFCI, a dirty door latch) to reading the failure signature that tells you the high-voltage circuit is gone, then helps you make the repair-or-replace call with real numbers.
 Easy45 min
How to Repair a Shower Diverter Valve
When you pull the diverter knob and water still pours from the tub spout instead of the showerhead, the fix is usually a worn washer or mineral buildup — not a $200 plumber visit. This guide covers the three most common diverter types (tub spout, three-valve, and two-valve) and walks you through cleaning, replacing washers, and swapping the diverter if needed, all in under an hour with basic tools.