How to Replace a Downspout

A crushed, leaking, or detached downspout dumps roof water right at your foundation — the single most common cause of wet basements — and replacing one is among the easiest exterior repairs there is. Parts are standard at any home center ($25-60 for a typical run with elbows and straps), the only real tools are a hacksaw and a drill, and the whole swap takes about 90 minutes. The trick that separates a dry wall from a streaky one is assembly order: every upper piece slips INSIDE the piece below it.
What You'll Need
🛠 Tools
📦 Materials
Safety First
- •Freshly cut aluminum is razor-sharp — wear gloves when cutting, crimping, and handling sections.
- •Use a stable ladder on firm ground for the gutter-outlet connection, with three points of contact. If the outlet is at second-story height, treat this as a pro or two-person job.
- •Match your fastener metal to the downspout (aluminum or stainless screws into aluminum). Plain steel screws into aluminum corrode the joint with galvanic corrosion and bleed rust streaks down the wall.
Step-by-Step Instructions
Size Up the Old Downspout Before the Store Run
Note why it failed (crushed, split seams, detached straps) so you don't rebuild the same problem, then record what you're matching: the tube size (2x3-inch standard or 3x4-inch high-capacity), the total drop from gutter outlet to grade, the number of elbows (usually two at the top to offset from the gutter to the wall, one at the bottom), and the wall material the straps fasten to. A phone photo of the top elbow assembly is worth more than a sketch.
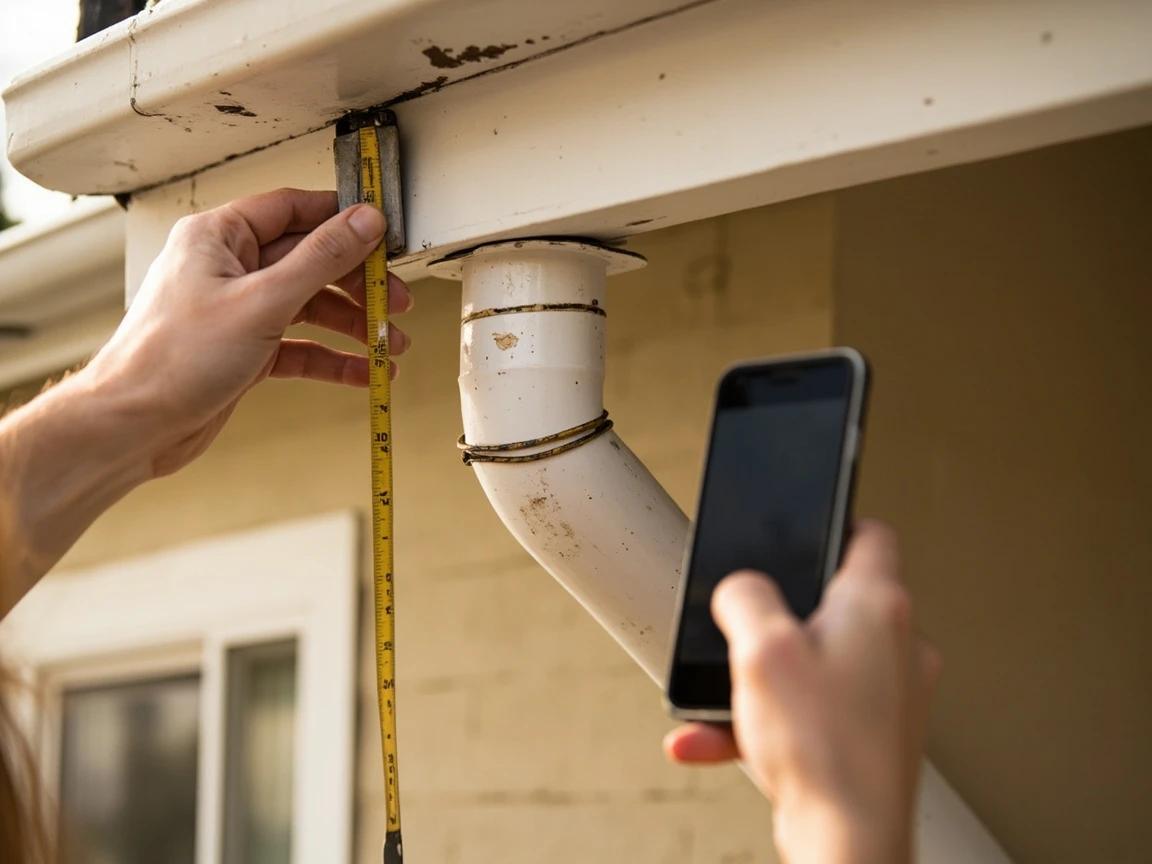
Buy one section more than your measurement says. Offcuts are useful, mistakes happen, and a 10-foot aluminum section costs less than a second trip.
Remove the Old Downspout
Back out the zip screws at the gutter-outlet connection and at each joint you can reach, then unscrew or pry the wall straps and lift the old downspout away — it may take a wiggle to free the top elbow from the outlet drop. Pull any straps you're not reusing and back their screws out of the wall. Check the outlet itself: it should be tight in the gutter floor with intact sealant around it.
Dry-Fit the Top Elbows
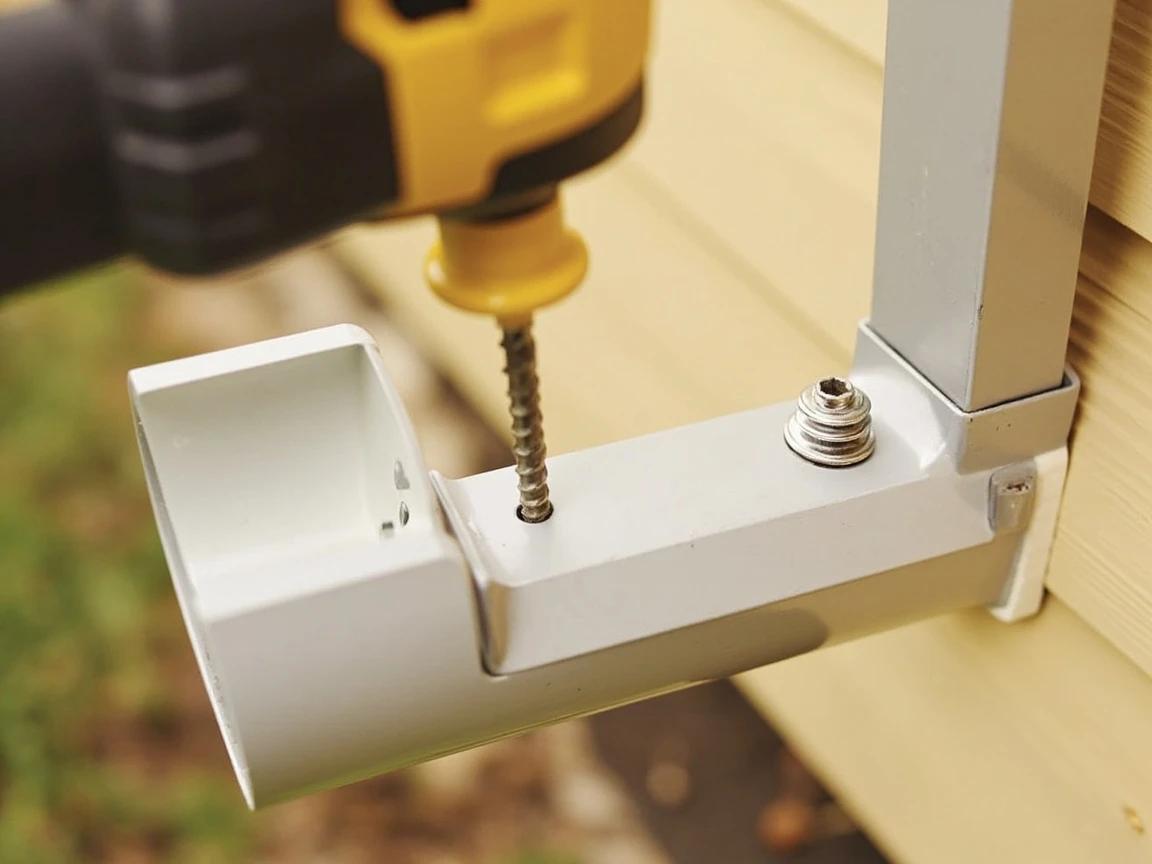
Slip one elbow onto the gutter's outlet drop and hold a second elbow against the wall below it to plan the offset — the short diagonal piece between them brings the downspout from the gutter lip back to the siding. Measure the gap between the two elbows, add about 3 inches total for the overlaps at each end, and that's your first cut piece. Don't screw anything yet; the whole run dry-fits first.

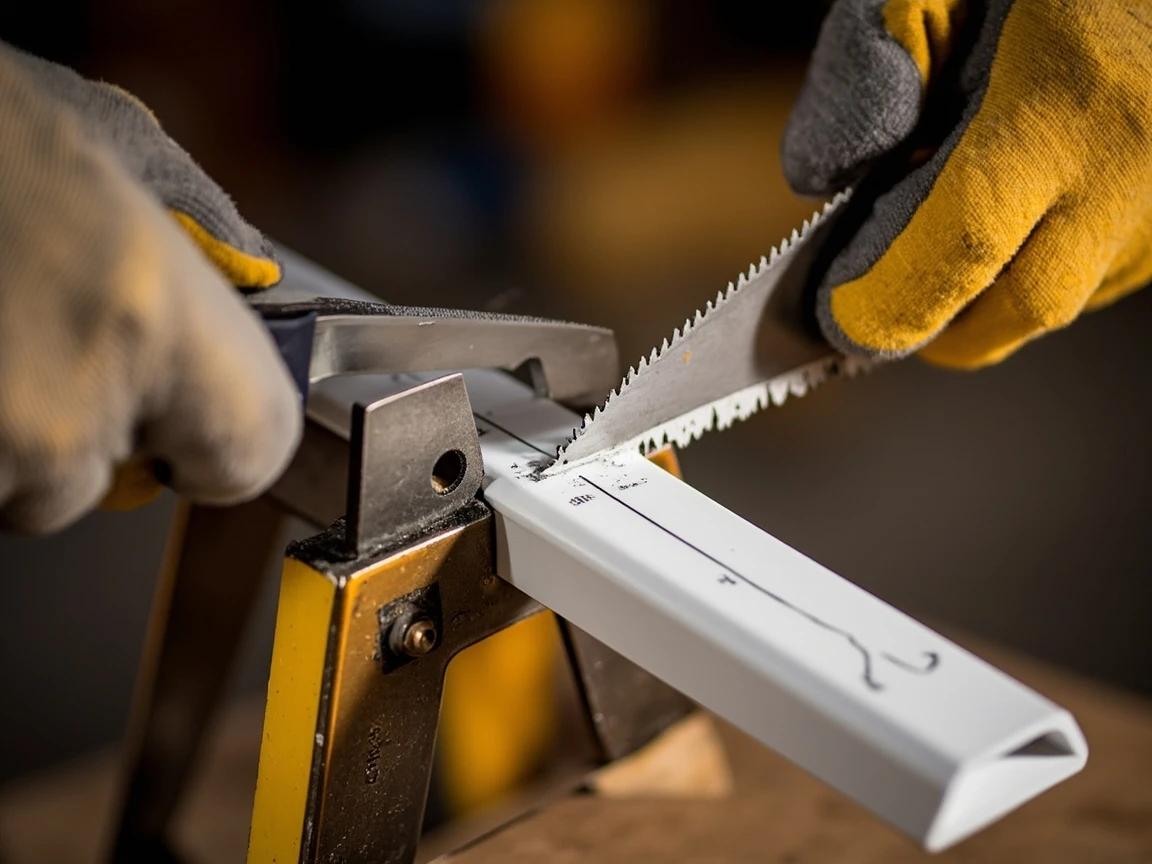
Cut Sections to Length
Mark your cut lines square around the tube with a marker, support the section so it doesn't flex, and cut with a fine-tooth hacksaw (or work around the tube with aviation snips). Cut on the plain end — keep the factory-crimped end intact whenever you can, because it's your next connection. Deburr sharp edges with a quick file pass and keep gloves on.
Crimp the Cut Ends So Upper Fits Inside Lower
Every joint telescopes about 1-1/2 inches, and water must always pass from an upper piece INSIDE the piece below — so the downhill end of each upper piece needs to be slightly narrowed. Factory ends come pre-crimped; for your cut ends, squeeze a series of small folds around the end with a downspout crimper (or needle-nose pliers, one small bite at a time) until it slips snugly into the next section. Get this backwards and every seam will weep down the siding.
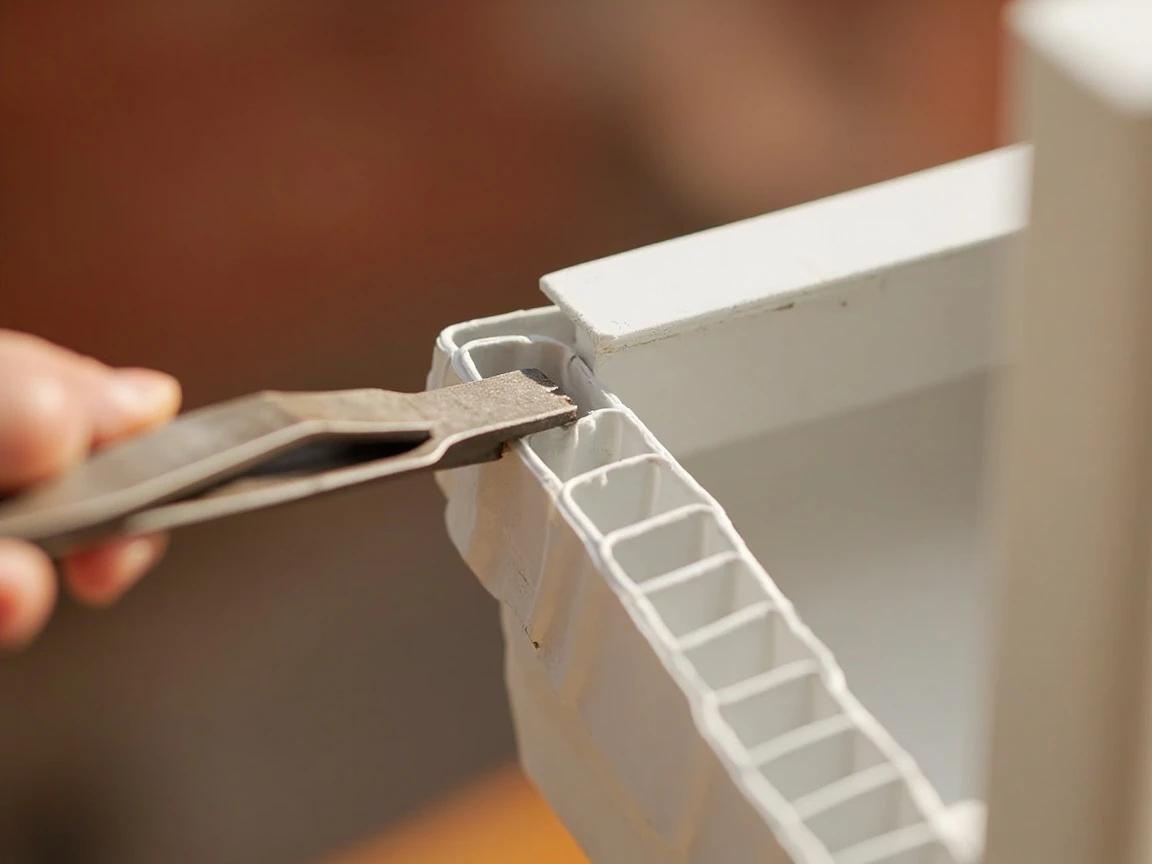
Upper inside lower — always. It looks tidier to slip the lower piece up inside the upper one, but that orientation funnels every drop of water out through the joint instead of past it.
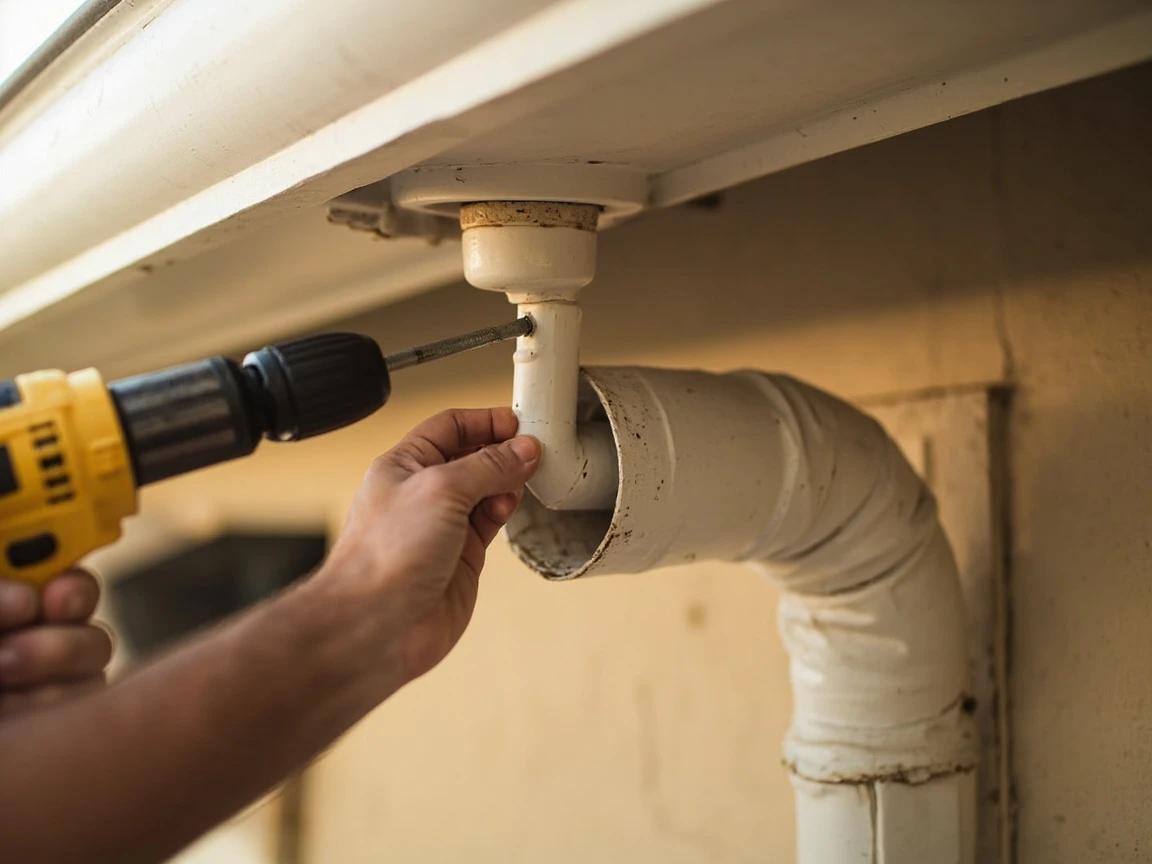
Assemble the Run With Zip Screws
Working from the top down, fit the first elbow on the outlet, the offset piece, the second elbow, then the long drop section(s). Seat each joint fully, then lock it with one or two 1/4-inch hex zip screws driven through the overlap on the sides of the tube — not the face you see from the yard, and never on the back where they'd rub the wall. Keep screws short so they don't reach the water path's opposite wall and snag debris.
Use aluminum or stainless screws on an aluminum downspout. Plain steel fasteners set up galvanic corrosion and leave rust streaks within a couple of seasons.
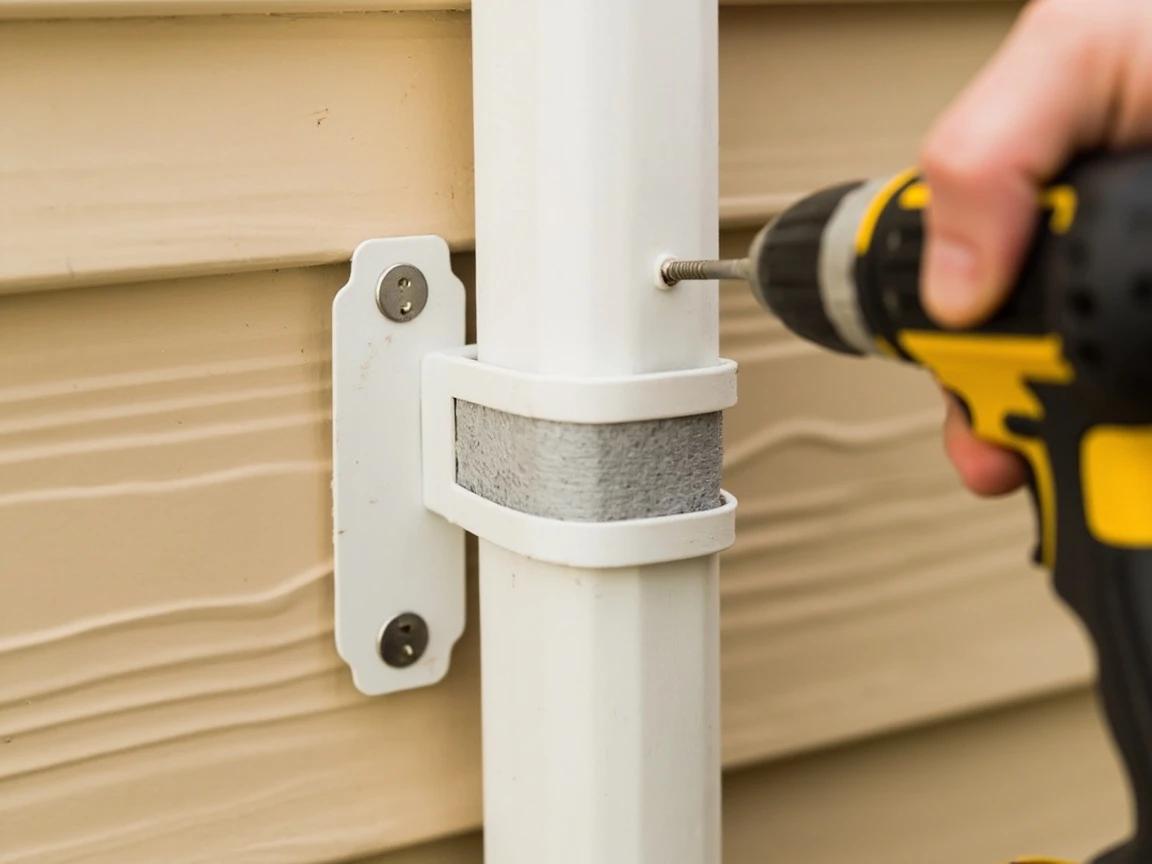
Strap the Downspout to the Wall
Stand the assembled run plumb against the wall and fasten a strap near the top, one near the bottom, and one every 6-8 feet between — two straps for a typical one-story run, three for two stories. Screw straps into siding/sheathing directly, or drill and use masonry anchors in brick. Snug is right: straps should hold the tube firmly without crushing the profile.
Add the Bottom Elbow and Carry Water Away
Fit the discharge elbow at the bottom so it kicks water away from the wall, then land it on a splash block or — better — connect a rigid or roll-out extension that carries discharge at least 4-6 feet from the foundation (10 feet on clay soil or where grade slopes toward the house). Finish with a hose test: run water into the gutter and check every joint for weeping and the discharge point for distance. A dry seam line and water landing well away from the foundation means you're done.
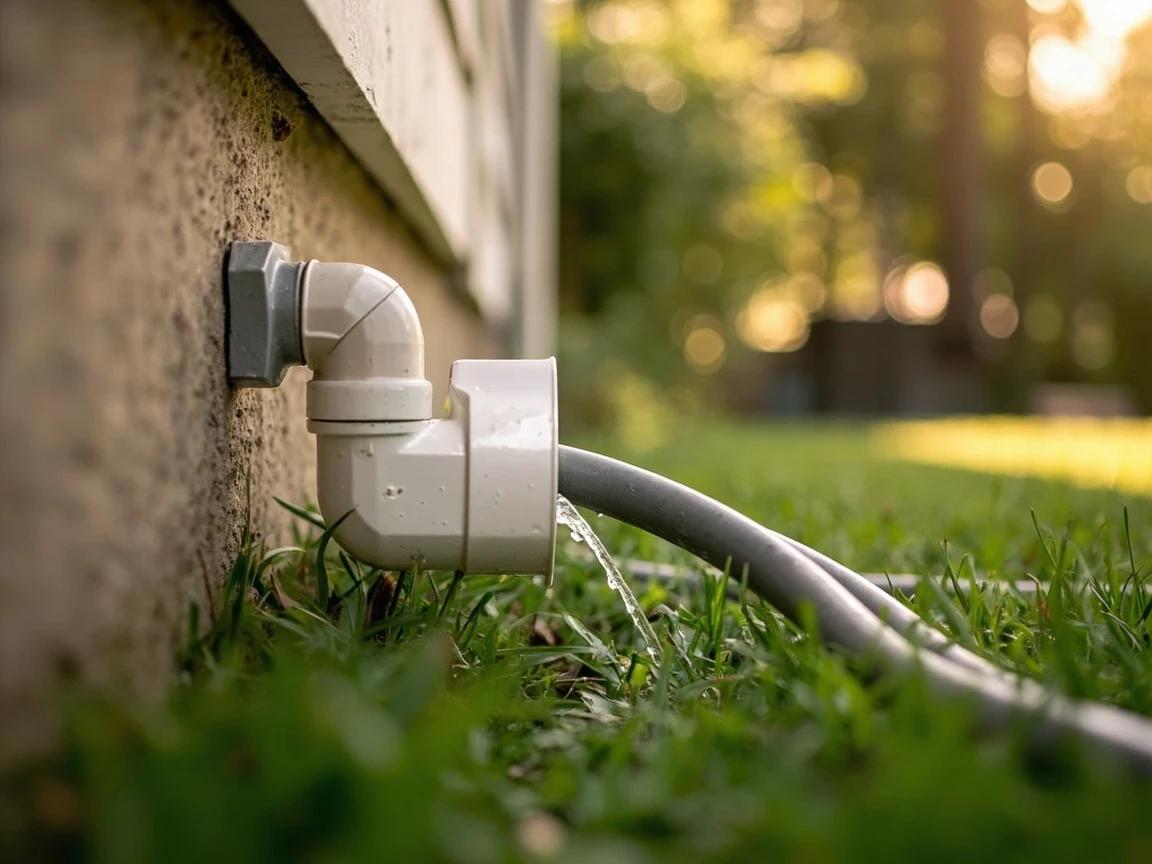
If the mower keeps eating your extension, swap it for a hinged elbow that flips up for mowing, or bury a short drain line to a pop-up emitter — the foundation stays dry either way.
Frequently Asked Questions
What size downspout do I need — 2x3 or 3x4?
+
Match what your gutter outlet already is: 2x3-inch is the residential standard and 3x4-inch is the high-capacity option for big roof areas or heavy-rain regions. The size is the rectangular dimension of the tube. If you're upgrading because a gutter overflows in storms, a 3x4 swap also requires changing the outlet in the gutter, so most like-for-like replacements stay with the existing size.
Why does my downspout leak at the seams?
+
Nine times out of ten the sections were assembled backwards. Each upper piece must telescope INSIDE the piece below it so water passes downhill inside the tube; assembled the other way, every joint catches water and weeps down the siding. The crimped (narrowed) end of each section points down, into the next piece.
How far should a downspout discharge from the house?
+
Carry the water at least 4-6 feet from the foundation — farther (up to 10 feet) on clay soils or where the grade slopes back toward the house. A splash block handles modest roof areas; a rigid or roll-out extension does it better. Dumping at the foundation is the most common cause of damp basements and settled slabs, so this last elbow is the most important part of the job.
How many straps does a downspout need?
+
At least two — one near the top and one near the bottom — and one roughly every 6-8 feet of run, so a typical one-story downspout takes two and a two-story takes three. Fasten straps into solid material: siding over sheathing takes screws directly, while brick or stone needs masonry anchors.
Can I connect my downspout to an underground drain pipe?
+
Yes — a buried 4-inch PVC or corrugated line to a pop-up emitter or daylight outlet keeps water far from the foundation and removes the trip-hazard extension. It's a separate digging project though: call 811 before trenching, keep slope on the pipe, and add a debris filter or cleanout where the downspout enters. Many municipalities prohibit tying roof drains into the sanitary sewer, so check local rules.
Community Tips
💬 Sign in to share tips with the community
Sources & further reading
- How to Install Rain Gutters — This Old House
- How Much Does It Cost to Install Downspouts? — Angi
- How Much Do Downspouts Cost to Install? — HomeGuide
More Roofing & Siding Guides
View all → Medium45 min
How to Repair Vinyl Siding
Cracked, holed, or loose vinyl siding panels let moisture behind the wall sheathing where it causes mold, rot, and insect damage — problems that cost thousands to fix if ignored. Replacing a single damaged panel is a straightforward 45-minute job once you own a $5 zip tool, and patching small holes takes even less time. This guide covers both patch repairs for holes under an inch and full panel replacement, so you can match the fix to the damage.
 Medium2 hrs
How to Patch Cracks in a Concrete Driveway
Every crack in a concrete driveway is a water channel, and every winter that water freezes, expands, and pries the crack wider — which is why a $15 tube of polyurethane sealant today beats a $5,000 replacement in five years. The fix depends entirely on crack width: pourable filler for hairlines, backer rod and flexible caulk for the middle sizes, vinyl patcher for wide or crumbling sections. This guide sorts your cracks into the right bucket and walks each repair start to finish.
 Medium4 hrs
How to Repair a Soffit or Fascia Board
Peeling paint and soft, crumbling wood at the roof edge means the fascia (the vertical board behind the gutter) or soffit (the panel under the eave) is rotting — and every season you wait, the rot creeps toward the rafter tails it's nailed to. Swapping a damaged section is honest weekend carpentry: $50-150 in lumber and paint, basic tools, and one golden rule — find and fix the water source that caused the rot, or you'll be back on the ladder in two years.
You Might Also Like
 Medium2 hrs
How to Prune Fruit Trees
Regular pruning is the most important annual task for fruit tree health and productivity. Properly pruned trees produce larger, higher-quality fruit, resist disease better, and live significantly longer than unpruned trees.
 Easy25 min
Best Deck Stain: Transparent vs Semi vs Solid
There is no "best" deck stain — there is the right stain for your sun exposure, wood condition, and how often you want to redo the job. Transparent stains last 1-2 years but let the natural grain show. Solid stains last 4-7 years but look like paint. This guide walks the four opacity levels and the oil-vs-water choice so you pick the one that matches your deck and your tolerance for re-staining.
 Medium30 min
How to Troubleshoot a Microwave That Won't Heat
A microwave that runs — light on, turntable spinning, timer counting down — but leaves food stone cold is one of the most common appliance failures, and about half the time the cause is something you can fix in five minutes for free. This guide walks the diagnosis from the easy stuff (demo mode, power level, a tripped GFCI, a dirty door latch) to reading the failure signature that tells you the high-voltage circuit is gone, then helps you make the repair-or-replace call with real numbers.