How to Replace a Bathroom Faucet

Swapping a tired bathroom faucet for a fresh one is one of the highest-impact DIY upgrades in the house — a $60 to $150 fixture and 60 to 90 minutes of work transforms how a bathroom feels and quietly fixes years of drips, mineral staining, and a wobbly handle. The single trick that separates a 90-minute project from a four-hour Saturday is owning a basin wrench (about $15); without one, the mounting nuts six inches up inside the cabinet are essentially out of reach.
What You'll Need
🛠 Tools
📦 Materials
Safety First
- •Close the angle stop valves SLOWLY and confirm they hold — turn the old faucet on after closing them; the flow should stop within 5 seconds. If a valve will not fully close, do not proceed with the swap until the valve is replaced; you will flood the bathroom the moment you disconnect the supply line.
Step-by-Step Instructions
Identify Your Sink's Hole Configuration
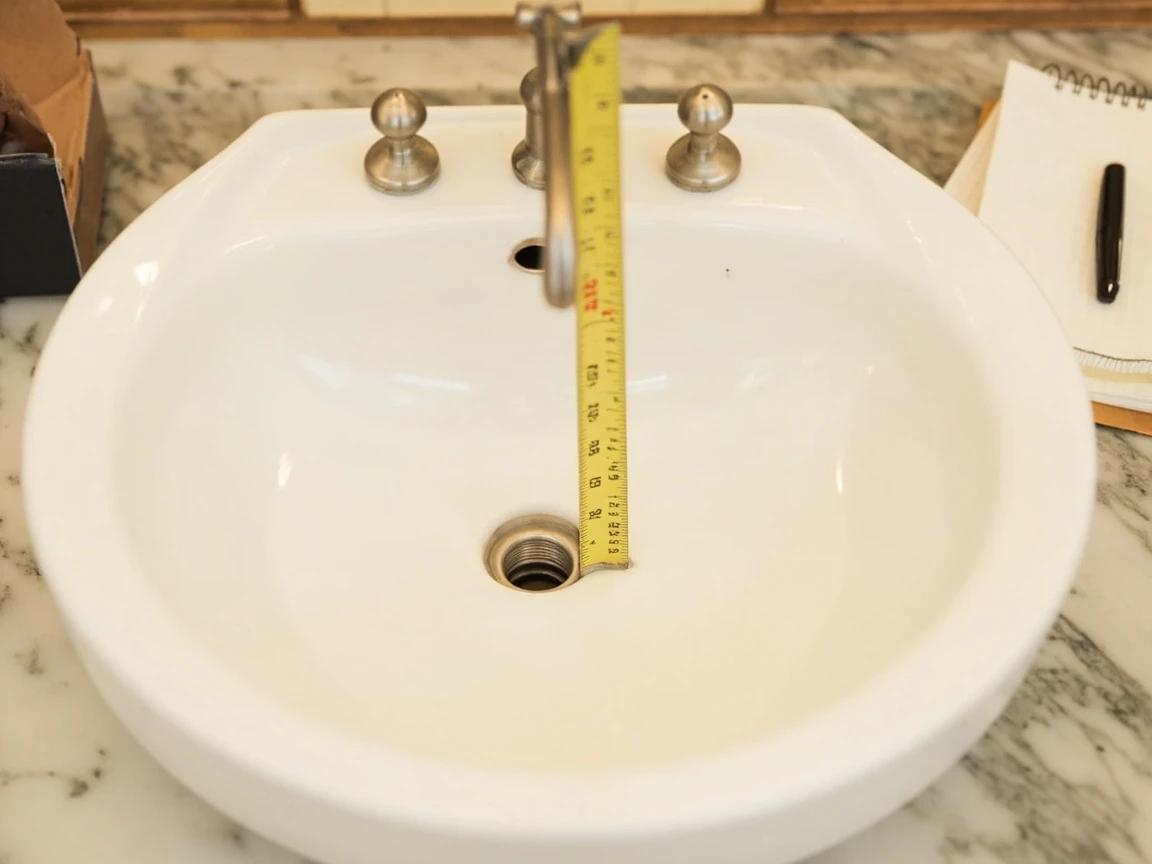
Look at the deck of your existing sink (the flat ring of porcelain or metal around the bowl). Count the holes that the current faucet uses — 1, 3, or sometimes 4 if there is a side soap dispenser. For 3-hole sinks, measure center-to-center between the two outer holes: 4 inches means centerset (one combined faucet plate covers all three holes); 6 to 16 inches means widespread (three separate pieces — spout in the middle, hot and cold handles outboard). Single-handle faucets can cover a 3-hole sink with an included escutcheon plate, but a 3-hole faucet cannot bridge a single-hole sink.
Take a photo of the underside of your existing faucet showing the mounting hardware and supply-line connections BEFORE you go to the hardware store. The aisle has 40 similar boxes and a phone photo settles brand and size questions in seconds.
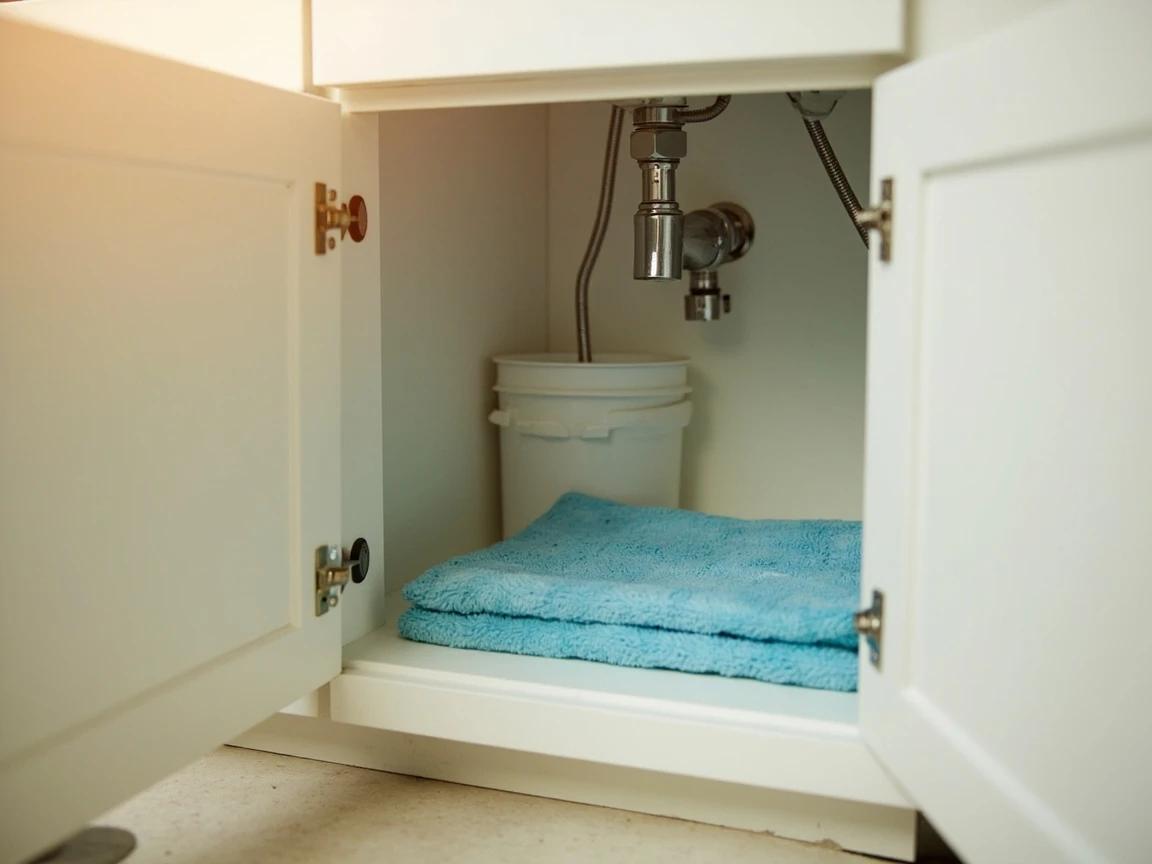
Clear the Cabinet and Shut Off the Water
Empty everything from under the sink — even items that seem out of the way. You will be on your back inside the cabinet for 20-40 minutes and every object becomes an elbow-bruising obstacle. Place a folded towel or knee pad on the cabinet floor. Reach behind the supply lines and turn both angle-stop valves clockwise until they stop, then turn on the old faucet to relieve pressure and confirm the water actually shut off — if water keeps trickling, go back and try the valves again or use the main shutoff.
If an angle-stop valve will not fully close (water keeps flowing from the open faucet), STOP. Old multi-turn valves often fail when you finally try to use them. Replace the valve first (or shut off the main and replace both stops while you have the faucet apart) — do not proceed with a half-closed valve, because the moment you disconnect the supply line, the bathroom floods.
Disconnect the Supply Lines and Pop-Up Drain Linkage
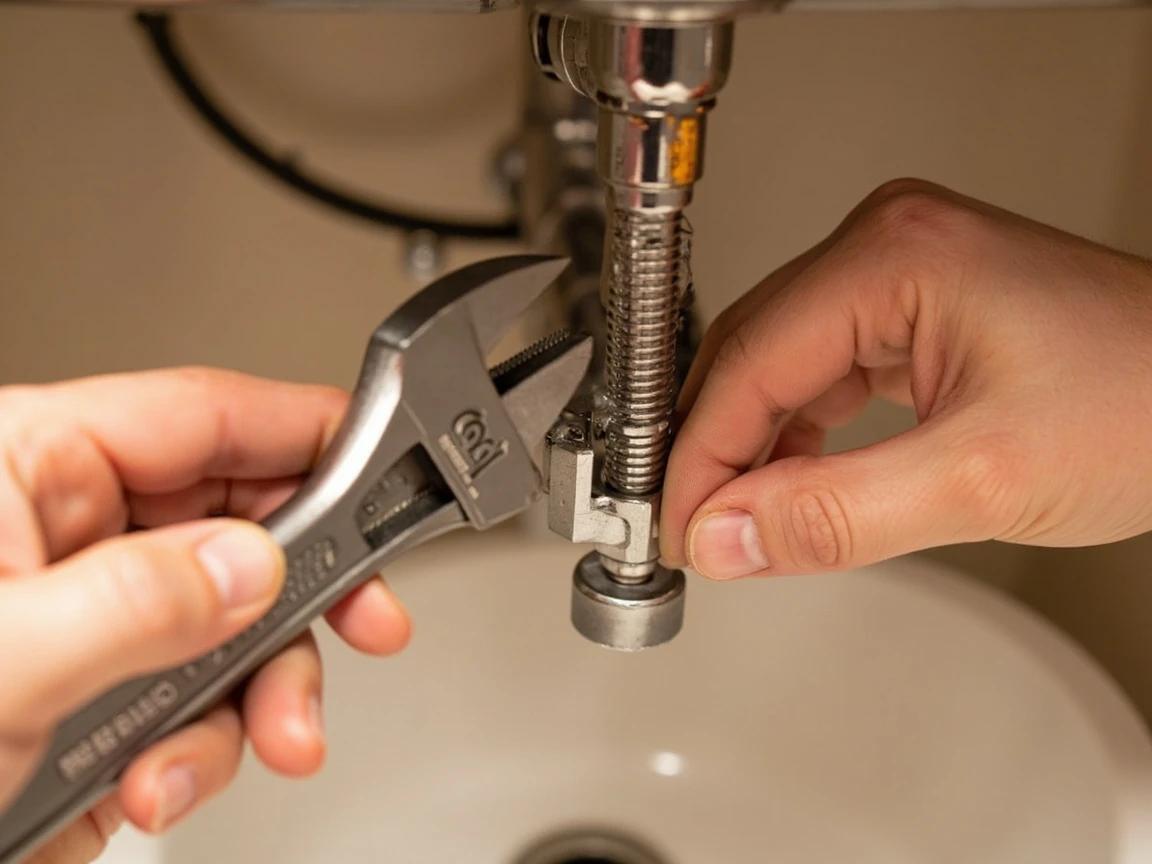
Place a shallow pan or thick towels directly under the angle stops to catch the half-cup of water still in the lines. Use your basin wrench or adjustable wrench to unscrew the compression nuts where each supply line meets the angle-stop valve (counterclockwise — work the bottom connection first, then the top at the faucet). Behind the drain pipe, find the pop-up linkage — a thin metal rod that runs from a horizontal pivot at the back of the drain up through the faucet body. Loosen the small screw or clip holding it to the lift-strap and slide the rod free.
Snap a phone photo of the pop-up linkage assembly BEFORE you disconnect it — the geometry (which hole on the lift-strap, which side of the pivot rod) is easy to forget by reassembly time, and getting it wrong means the sink stopper will not seal.
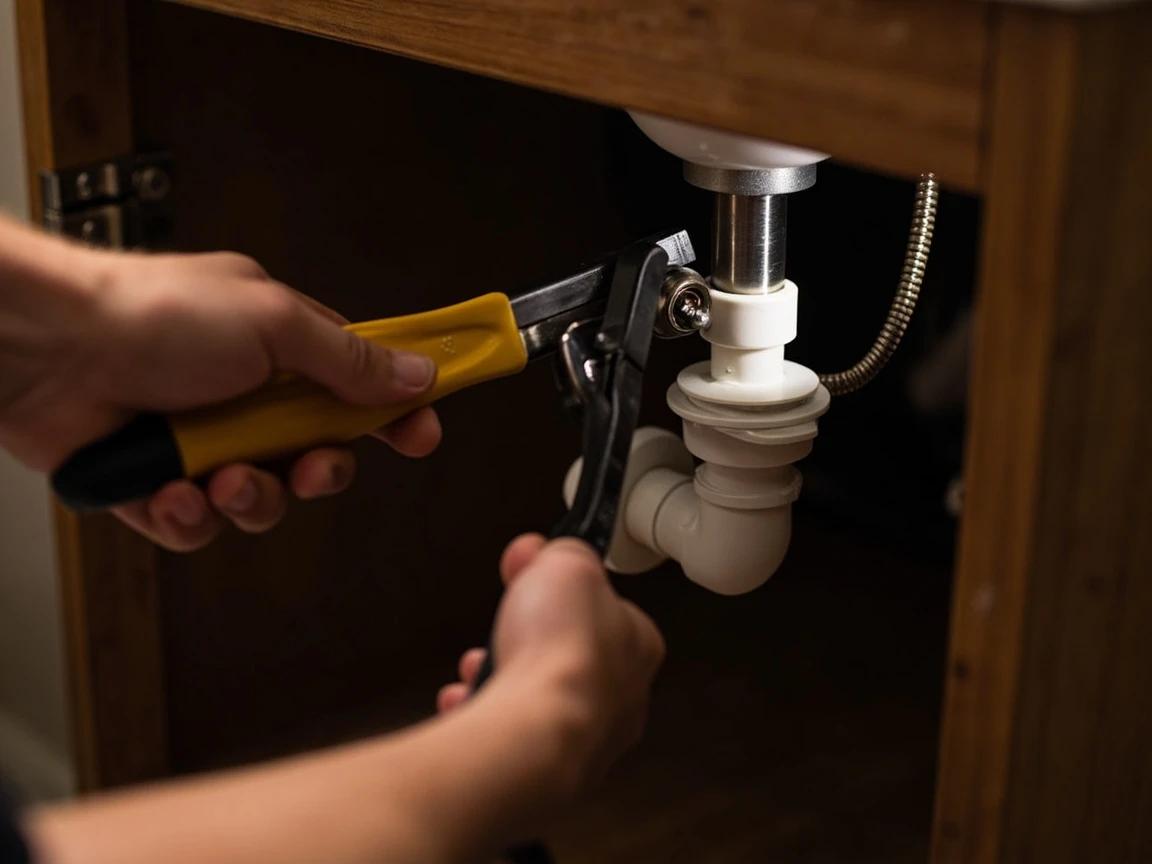
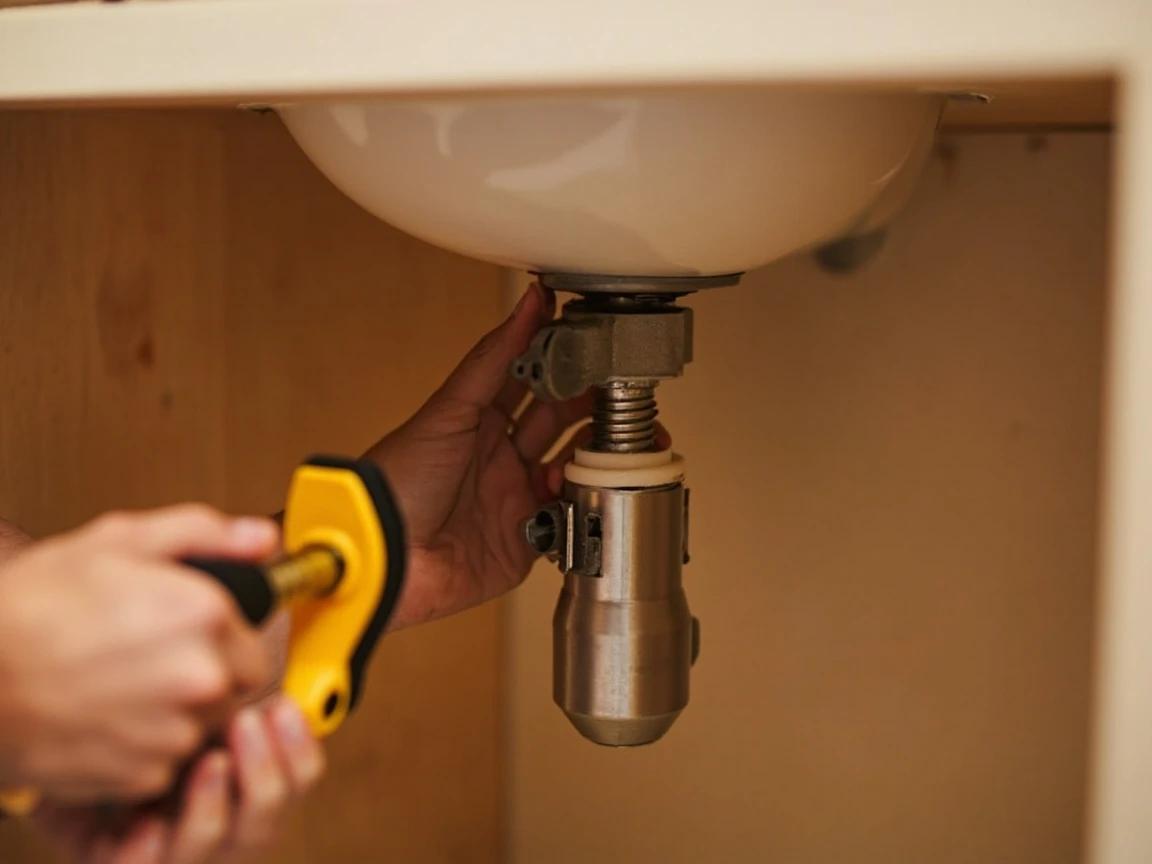
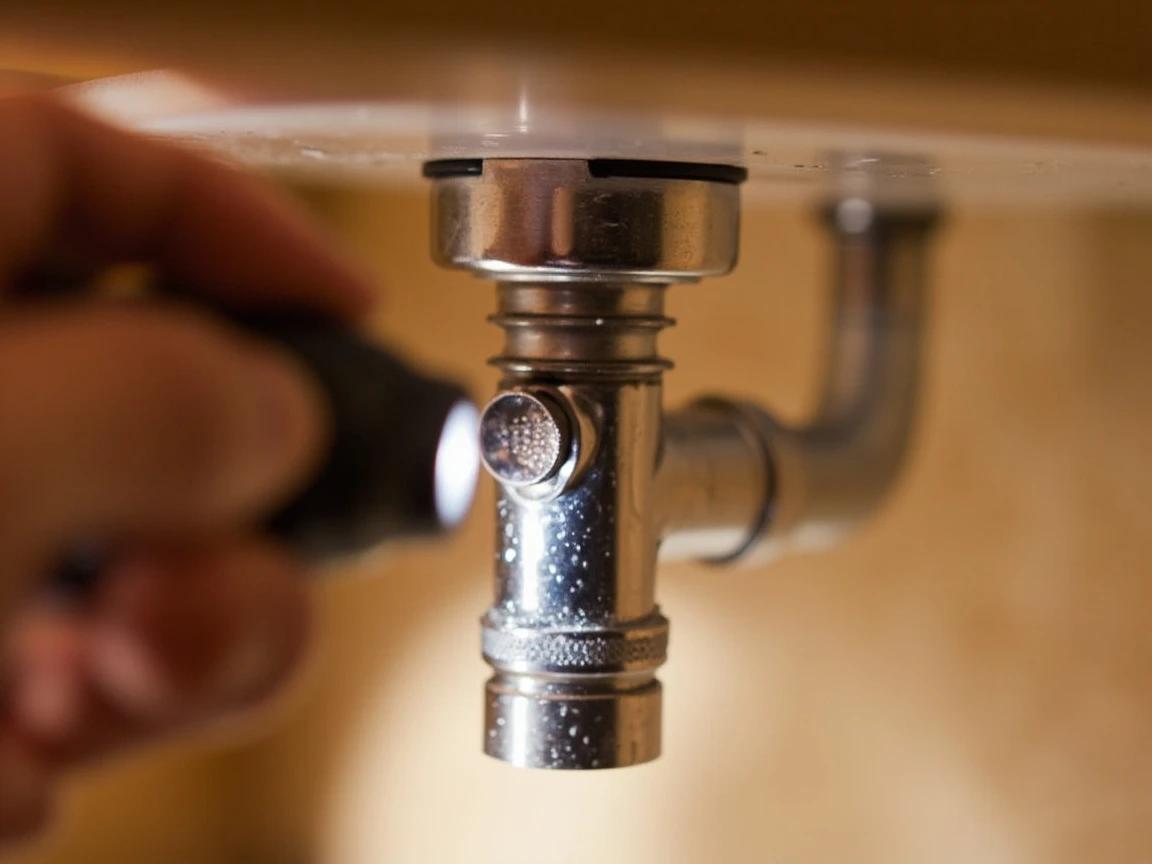
Remove the Mounting Nuts With a Basin Wrench
Lie on your back inside the cabinet with a headlamp on. Reach up to the underside of the sink — you will see one large plastic or brass nut on each faucet stud (single-handle: one nut; centerset: two nuts; widespread: three nuts). Hook the basin wrench's jaw onto each nut with the wrench shaft pointing away from the nut, then turn the shaft counterclockwise to loosen. If the nuts are corroded and will not turn after 30 seconds of effort, spray penetrating oil on the threads and walk away for 15 minutes — fighting a corroded nut barehanded is how DIY swaps turn into broken pipes.
Lift Out the Old Faucet and Scrape the Deck Clean
With all mounting nuts off, climb out of the cabinet and lift the old faucet straight up off the sink. Underneath you will see a ring of old plumber's putty, dried silicone, mineral crust, or all three. Scrape it off with a plastic putty knife — never a metal blade on a porcelain or stone deck, which scratches the finish. Wipe the deck with a rag wet with white vinegar to dissolve the last mineral film, then dry it completely. A clean dry deck is the difference between a faucet that seals on the first try and one that weeps from underneath for the next year.
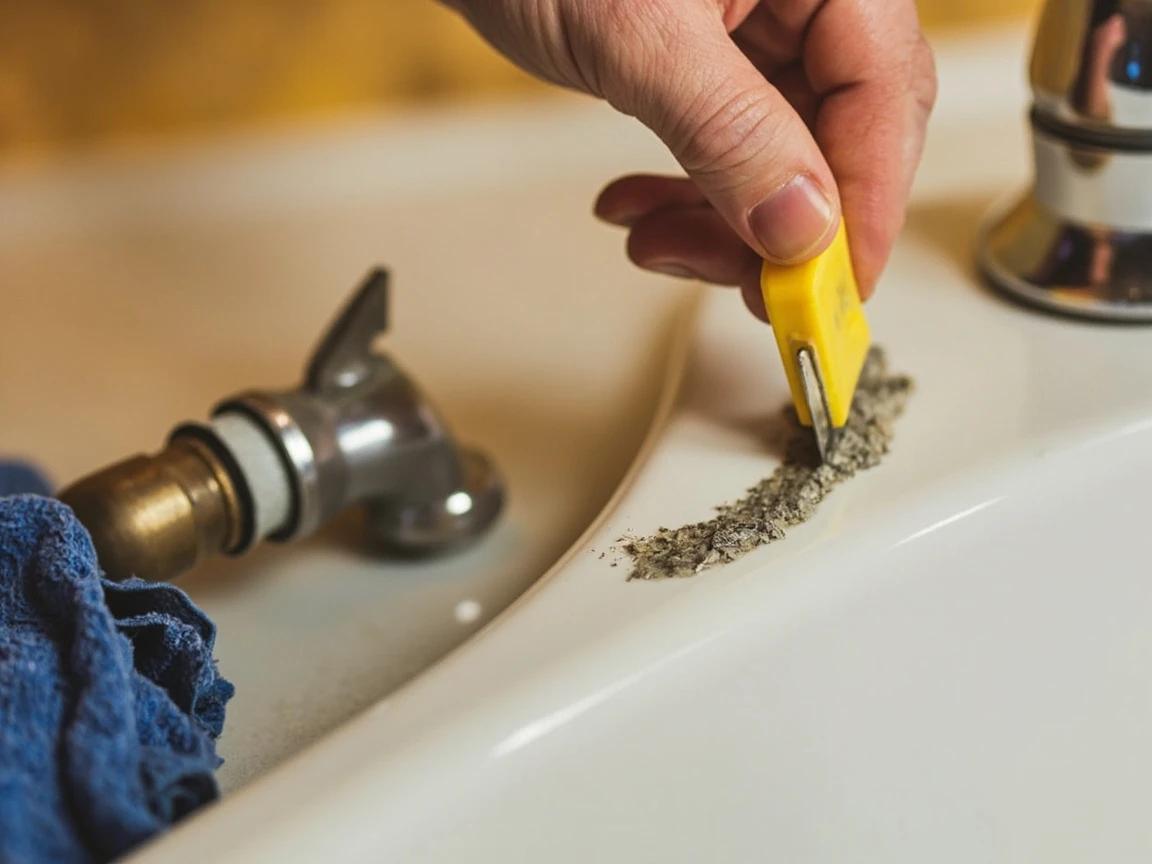
On marble, granite, quartz, or any natural stone sink, do NOT use plumber's putty under the new faucet — the oils in the putty bleed into the stone and leave a permanent dark ring around the faucet base. Use 100% silicone caulk instead, or rely on the rubber gasket if the new faucet includes one.
Place the New Faucet on the Deck
Unpack the new faucet and check whether it shipped with a rubber base gasket — most modern fixtures do. If yes, slide the gasket onto the underside of the faucet base and lower the faucet through the sink holes (gasket-only, no putty or silicone). If your faucet has no gasket, either roll a quarter-inch-thick rope of plumber's putty and press it in a continuous ring around the faucet base before setting it (for china or stainless sinks) or run a thin bead of 100% silicone caulk along the deck contact line (for stone or quartz). For widespread faucets, set the spout first, then the two handle valves, threading each through its own hole.
Before tightening anything, have a helper look at the faucet from above the sink to confirm it is square to the sink edge — once the mounting nuts are snug, micro-adjusting the rotation gets much harder. Two seconds of alignment now saves five minutes of rework later.
Tighten the Mounting Nuts From Underneath
Back under the sink with the basin wrench. Hand-thread each mounting nut up onto its faucet stud as far as it will go by finger pressure alone (the gasket compresses easily — overtightening cracks porcelain or distorts the gasket). Then use the basin wrench to snug each nut down with about a quarter to a half turn past hand-tight. Resist the urge to crank — modern plastic nuts strip easily, and the gasket only needs gentle pressure to seal. Wiggle the faucet from above; it should feel solid with no rock or rotation.
Connect New Braided Supply Lines
Take the two NEW braided stainless supply lines you bought (do not reuse the old ones — the internal gaskets are deformed). Thread the smaller compression end (3/8-inch) onto the angle stop, hand-tight first, then a quarter turn past with a wrench. Thread the larger end (1/2-inch IPS) up onto the faucet inlet stud — hand-tight, then a quarter turn. The hot line always goes on the LEFT inlet (looking at the faucet from the front) and cold on the right; mixing them is a five-minute fix but it is annoying. Skip PTFE tape on these connections — the rubber washers inside the coupling nuts make the seal, and tape on these straight threads can actually keep the washer from seating and cause a slow weep.
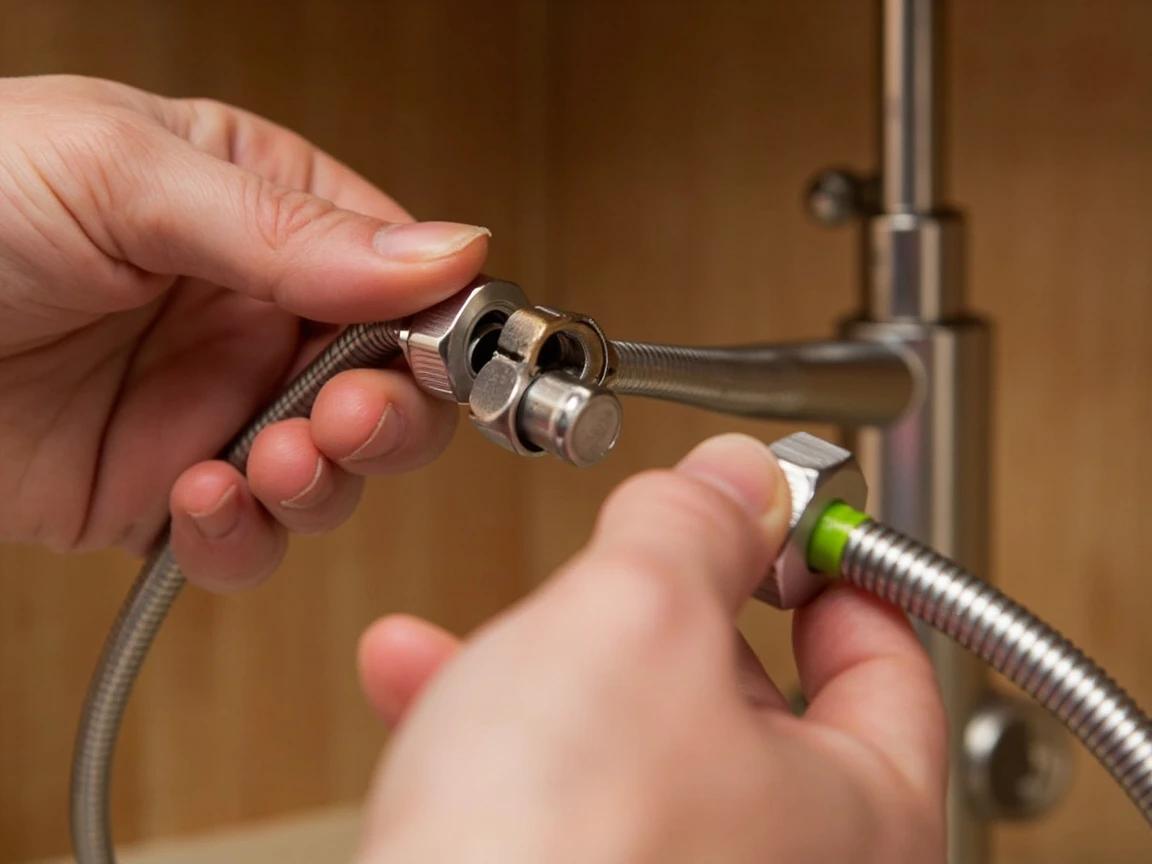
Buy supply lines 4-6 inches longer than the old ones — extra slack lets you route the line in a gentle curve instead of a tight bend, which extends its lifespan from about 5 years to 10+. Coil any extra length, do not crimp it.
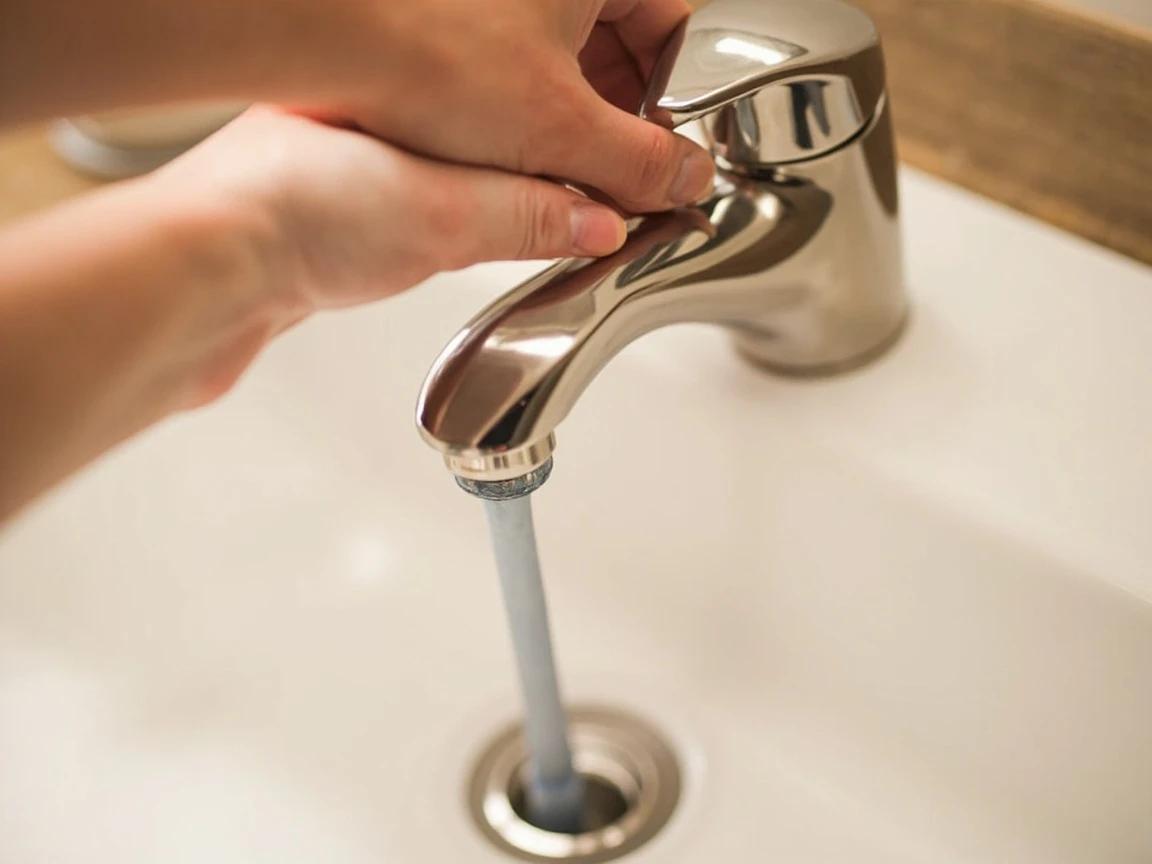
Open the Valves Slowly, Test, and Flush the Aerator
Open both angle stops slowly — over 10 to 15 seconds each, not all at once (abrupt pressure can stress fresh connections). Leave the new faucet OPEN as you do this, so air in the lines can escape through the spout rather than building pressure. Once water flows steadily, close the faucet and watch every connection (under the sink and at the faucet base) with a flashlight for a full 60 seconds — even a tiny weep will show. After confirming no leaks, unscrew the aerator at the end of the spout, run hot and cold full blast for 30 seconds to flush construction debris, then reinstall the aerator.
Always flush the aerator off and run full-blast for 30 seconds before first real use. Sediment kicked loose by the install gets caught in a fresh aerator screen on its first day, throttling flow permanently if you do not flush it out while you can still get the screen back off.
Frequently Asked Questions
Do I really need a basin wrench, or can I use a regular wrench?
+
You really need one. The faucet mounting nuts sit on the underside of the sink deck, 6 to 12 inches up inside the cabinet, and there is no angle at which a regular open-end or adjustable wrench can grip them. A basin wrench has a swivel jaw on a long shaft designed exactly for this; the RIDGID EZ Change tool ($20) is a more modern equivalent. Skipping this tool is the single biggest reason DIY faucet swaps get abandoned half-done.
Can I reuse the old supply lines?
+
No. Even if the old lines look fine, the internal rubber gaskets have set to the shape of the old faucet inlets and rarely re-seal cleanly on a new fitting. New braided stainless steel supply lines cost $5 to $8 each — it is the highest-leverage $15 you will spend on the job. Reusing the old lines is the #1 cause of slow under-cabinet drips that surface a week after the install.
Should I use plumber's putty or silicone under the faucet base?
+
Use whatever the new faucet's instructions specify, but in practice: most modern faucets ship with a rubber gasket and need NEITHER. Plumber's putty under a rubber gasket can actually damage natural-stone sinks because of oil bleed staining the marble or granite around the base. If your faucet has no gasket, use plumber's putty on china and stainless sinks, and use 100% silicone on natural stone or quartz.
How do I tell if I have a centerset or widespread faucet?
+
Measure between the centers of the two outer holes in your sink deck. Four inches apart means centerset — the spout and both handles mount on a single plate. Eight inches (or more) means widespread, where each handle and the spout are separate pieces that thread through three independent holes. A single hole means you need a single-handle faucet (which can be installed with a base plate to cover a 3-hole sink, but a 3-hole faucet cannot bridge a single hole).
What if the shutoff valves are stuck or leak when I turn them?
+
If the valve handle will not budge, do NOT force it — snapping a corroded angle-stop valve floods the bathroom in seconds. Spray penetrating oil at the valve stem where it enters the body, wait 15 minutes, then try gently with the right-sized pliers. If the valve turns but starts weeping from its body once it is closed, the valve packing is failing and the valve itself needs to be replaced before you do the faucet swap. That is a separate job (we have a guide for installing a water shut-off valve) or a $100 pro call.
Community Tips
💬 Sign in to share tips with the community
Sources & further reading
- Replacing a Bathroom Faucet — Lowe's
- How to Install a Bathroom Faucet — This Old House
- How to Replace a Faucet — Family Handyman
More Plumbing Guides
View all → Easy30 min
How to Replace a Shower Head and Shower Arm
Swapping just the shower head is a 10-minute job, but if the arm (the pipe curving out of the wall) is corroded, leaking, or the wrong length for a new rain head, you'll want to replace both. The whole job costs under $50 and takes half an hour — the one trick that separates a clean swap from a flooded wall is holding the arm steady so it doesn't snap off inside the tile. This guide covers removing a stuck arm, prepping the in-wall fitting, taping the threads right, and testing leak-free.
 Easy45 min
How to Unclog a Toilet Without a Plunger
It's 11 PM, the toilet won't flush, and the plunger is at your in-laws' house. Dish soap and a gallon of hot tap water will clear most clogs in 30 minutes for about a dollar — no plumber, no panic, no overflowing bowl. This guide walks through stopping the water first, the dish-soap method, the baking-soda-and-vinegar backup, and the wire-hanger snake for stubborn clogs, plus the boiling-water mistake that cracks porcelain and turns a $1 fix into a $400 toilet replacement.
 Easy40 min
How to Fix a Leaky Pipe Joint
A weeping pipe joint under the sink is one of the most common — and cheapest — plumbing repairs you'll ever make. A roll of Teflon tape and a small tube of pipe joint compound cost under $10 and will fix the vast majority of threaded and compression joint leaks in 30 to 45 minutes, saving you the $150 to $400 a plumber would charge for the same trip.
You Might Also Like
 Medium2 hrs
How to Patch a Large Hole in Drywall
A doorknob blowout, a wall-anchor failure, a fist through the drywall during the move-out — these holes are too big for spackle but too small to justify cutting in a full drywall section. The mesh patch (for 1/2-inch to 4-inch holes) and the California patch (for 4 to 8-inch holes) both finish flush, paint over invisibly, and cost under $25 in materials. The job takes about two hours of hands-on work spread over two or three days of compound cure time.
 Easy30 min
How to Replace an Electrical Outlet
A worn-out or discolored electrical outlet is one of the simplest electrical repairs you can tackle yourself — swapping one takes about 15-30 minutes and costs under $5 in parts versus $75-150 for an electrician visit. This guide walks you through safely replacing a standard duplex receptacle, including how to handle the wiring correctly and avoid the most common DIY mistakes.
 Medium45 min
How to Install a GFCI Outlet
A GFCI outlet cuts power in a fraction of a second when it senses electricity leaking to ground — the exact protection code now requires in kitchens, bathrooms, garages, basements, laundry rooms, and anywhere outdoors. Installing one yourself takes about 45 minutes and costs $15-25 in parts versus $120-250 for an electrician. This guide shows you how to wire the LINE and LOAD terminals correctly so the outlet actually works the first time — and how to protect a whole string of downstream outlets from a single device.